
If you play the bass – hell, if you own a bass – musicians will assume you can play the 12 bar blues. Even if you can’t. This can lead to all kinds of awkward and uncomfortable situations. Something like this, perhaps:

You get invited to a jam session. You show up, plug in. The “oh-s***-what-are-we-gunna-play” look gets passed around the room. The guitarist makes a move:

– they say in their bluesy, raspy voice.
The keys player looks at you with an air of music-theory-superiority and says:

Your palms begin to sweat. Your eye gets twitchy. You have no idea what anyone is talking about. You thought jam sessions were code for “let’s smoke weed.” The drummer raises their sticks… the dreaded count-in! click… click…. click… click….
Fear not.
You’ll never be that poor, doomed bass player. By the end of this article, you’ll be playing a basic 12 bar blues and be able to survive blues jams in any key. I’ll show you two Blues Survival Shapes and breakdown and explain all the jargon and theory you’ll need to feel clear and confident for your first 12 Bar Blues jam.
So, rather than jumping in with deep and weighty music theory explanations, we’ll start with the first practical piece of info you’ll need to get you playing the blues on your bass.
#1What Key Are You In?
The first step in surviving your blues jam experience is to know what key you’re in. The key will generally be called out, as in the example above, and it will be a note name. In the example the guitarist calls out a 12 bar blues in the key of E.
The key of the 12 bar blues is your MUSICAL HOME for that song. It’s the note the blues progression will START on, it’s the note you END on when it’s all over, and it’s the REFERENCE POINT for finding the other notes in the 12 bar blues progression.
Don’t worry if you don’t know where the notes are on your bass. In this article, I’ll show you all the notes you need.
For our example, a 12 bar blues in the key of E, you’ll need to find an E on your bass.
However, not just any E will do (looking at you open string E). We’ll use the E on the 7th fret of the A string:
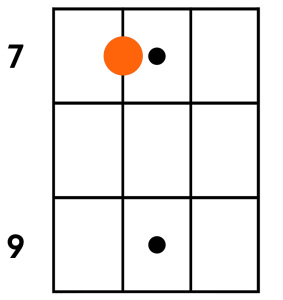
You’re here. You’re home. Remember this sound, and lock in this position on the fretboard. If the sh** hits the fan and you have no idea what’s going on in the jam, run home. It’s the right note 2/3rds of the time in a 12 bar blues. Those are good odds.
#2Blues Survival Shapes
You’ve found the key you’re in. That’s your musical home. You can play the note that’s right 2/3rds of the time. But what about the other 1/3rd of the time? 2/3rds is good… but if you’re getting stink-eye looks from the keyboard player 1/3rd of the jam, it’s gonna be awkward.

To quickly get you to all the notes you’ll need in a 12 bar blues jam, I’m going to show you two blues survival shapes.
 A shape is a VISUAL PATTERN on the neck. It’ll give you a visual shortcut to know what to play in certain situations.
In this case, you’ll get 2 shortcuts to play the notes needed for a 12 bar blues.
In the 12 bar blues (and really, in all styles of music) movement between notes or chords of a song can be described in numbers. Those numbers all come from the major scale. I’ll explain this in detail later on. For now, just take it on faith.
A 12 bar blues moves between 3 different chords – the 1, 4 and 5. This is the more modern, Nashville numbering style. Some styles (I saw it all the time in Jazz) will use Roman Numerals.
The 1 chord is the key that we’re in – the musical home that you already found. In our example here, we’re still using E.
The survival shapes will show you how to quickly and easily find the 4 and the 5 once you’ve found your 1.
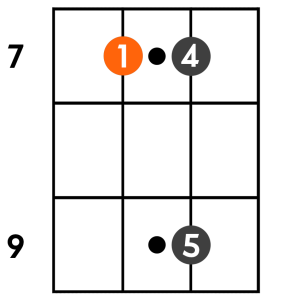
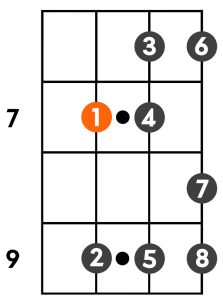
Because the 1 is home and is so dang important, it’s going to be orange.
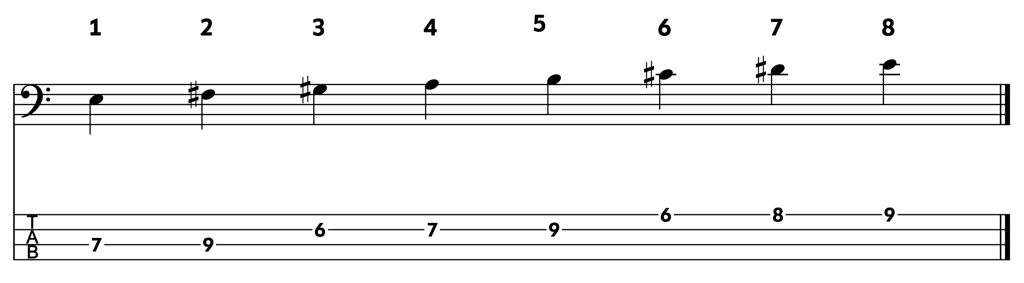
Our first Survival shape is the high shape:
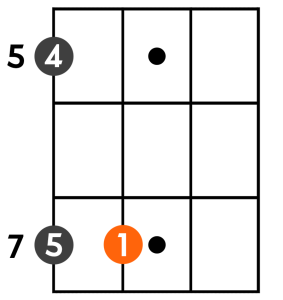
And now, the low shape. In the low shape, you’re finding the same notes, but the 4 and 5 are one octave lower; meaning, they are the same notes (A and B, respectively) but they’re one pitch level lower on your bass.
Just to really solidify these shapes, try them out in some different keys. Here are a couple examples to practice:
- Try G:

- Try F#:

#3Optional Theory Explanation Interlude
Understanding the numbering system that gives us the 1, 4 and 5 above can be a lifesaver… particularly for the likes of the hapless bass player in our original, heart-pounding example. In order to understand the why behind this numbering system, you need to know your major scale.
The major scale is (drum roll) majorly important (rim shot) because it is the ruler of music. A ruler is the tool we use for measuring the distance between things. In order for a ruler to work, we have to all agree on what our units of measurement will be.

The major scale gives that to us in music. The notes of the major scale become the marks on our musical ruler.
Knowing these distances is crucial to learning to communicate and understand musician jargon. These distances get referenced a lot.
Aside from the graphic below, I’m not going to go over playing a major scale. For the moment, this simple major scale shape will work for what we need to accomplish in this article.
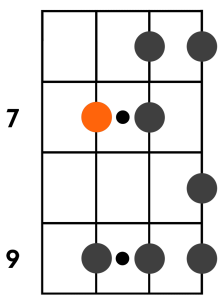
As you can see in the major scale fingering chart, there are 7 different notes in the major scale. (The eighth note is the same as the first, called the octave.) If we begin numbering them in order, 1 for our first note E, and so on and so forth, we get this:
You can see from the numbering system and your survival shapes that the 1, 4 and 5 are exactly what we’re using for the 12 bar blues. In other words, the 1 is the 1st note of the major scale, the 4 is the 4th note, and the 5 is the 5th note. Using just the numbers is a shorthand for musicians who want to quickly describe these chord movements and relationships.
#4What’s A Chord Progression?

You now have your key – your musical home – and your Blues Survival Shapes. And, if you valiantly detoured through the theory section above, you know why the chords are called 1, 4, and 5. The only thing left is to make sure we know when to play the 1, the 4 and the 5.
 The map that shows us what note to play and when is called a CHORD PROGRESSION.
The 12 bar blues chord progression is a visual guide to show you what chord to play, and when to change between them. In the case of the 12 bar blues, there are 3 chords that change at very specific times.
It’s not the bassist’s job to play the chords for a 12 bar blues (leave that to guitar and keyboard). Instead, we play root notes. The root note is the lowest note of a chord. It’s the foundation that the other notes of the chord sit on.
For the 12 bar blues we need three root notes: the 1, 4 and 5 from our Survival Shapes.
The Chord progression for a 12 bar blues is 12 bars in length. Each bar of music holds 4 beats of musical time. The drummer in the example at the beginning of the article sets the tempo for these beats with the clicks of the sticks. Every four of those clicks, and you’re in the next bar.

You can see that the only numbers in the chord progression are the 1, 4 and 5. So long as you remember your shapes, you’ll be able to get through the chord progression.
The last group of 4 bars is called the turnaround. This is the place in a 12 bar blues that has the most variation from song to song.
If you want to be savvy at the jam session, you can casually ask, before the blues jam starts, “what’s the turnaround?” And someone will usually rattle off 4 numbers to let you know what these 4 bars will be.
The reason it’s called the turnaround is because this is where the chord progression sets you up to start over again. It TURNS BACK AROUND to the beginning.
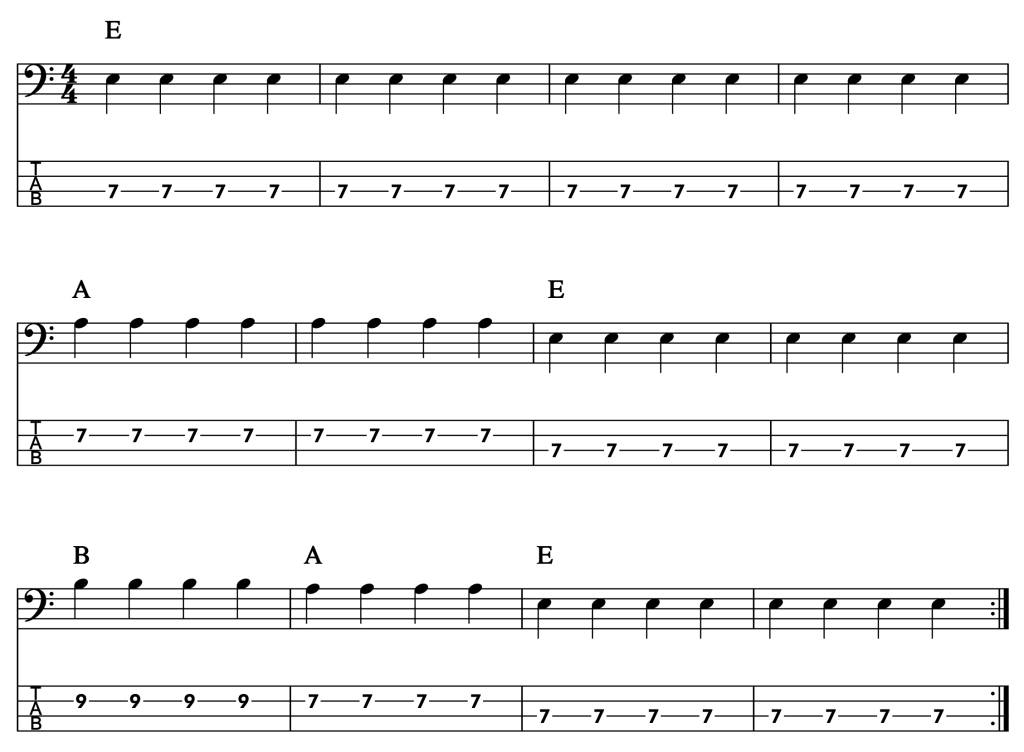
You know your key, you know your survival shapes, you have your 1, 4 and 5, and you know what a chord progression is. It’s time to play through the 12 bar blues in E.
For this playalong, you’ll use the high survival shape.
Just play one root note per beat, and follow along with the chord progression.

Get deeper into the blues – and every other bass-playing genre – in our full beginner bass course.
#5Play The 12 Bar Blues

You may find that once you know how to play a 12 bar blues progression, you won’t want to play anything else. This is perfectly natural. In fact, it is to be encouraged. If you’d like to play a few more 12 bar blues tunes, here are the appropriate chord charts, and a handy little flow chart for making sure you’re set up for 12 bar blues survival.
The first tune is “Killing Floor” by Howlin’ Wolf. This blues classic came out in 1964 and features Andrew McMahon on the bass. On the recorded version McMahon is doubling the guitar line, but in our playalong we’re going to just cruise through with simple rhythms using the survival shapes.
The chord progression here is almost the same. You’ll notice that the turnaround in this blues is slightly different than the one you did before in E. This turnaround goes 5, 4, 1, and then the last bar goes back to the 5.
Here’s the chord progression:
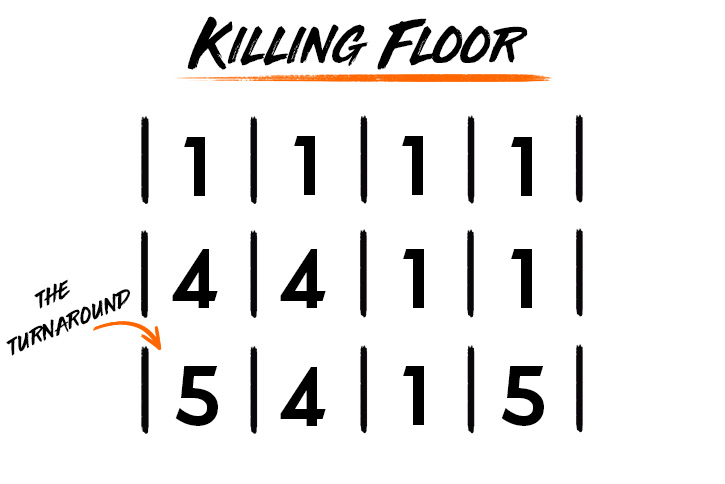
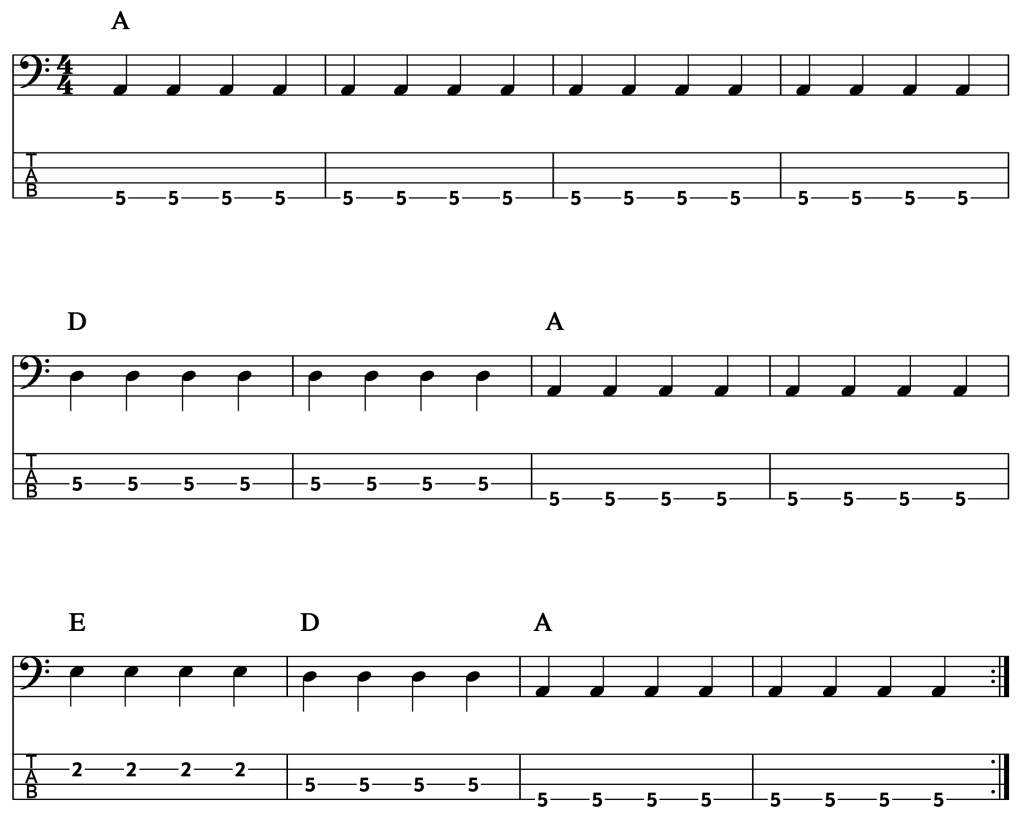
And, of course, because Killing Floor is in a new key (the key of A) you’ll have to re-set your blues survival shape.
Before you push play and try and groove along, make sure you’ve gone through these steps:
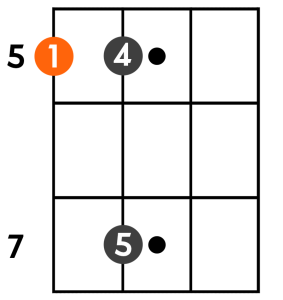
- Find your 1 – the key you’re in. (5th fret E string)
- Find your shape (high shape for this particular tune) and the 1, 4 and 5.
- Review the 12 bar chord progression
- Double check the turnaround (notice that the last bar goes back to the 5!)
- Listen first, and follow along with your ear
OK – if you made it through the checklist, you’re ready.
Here’s the tab:
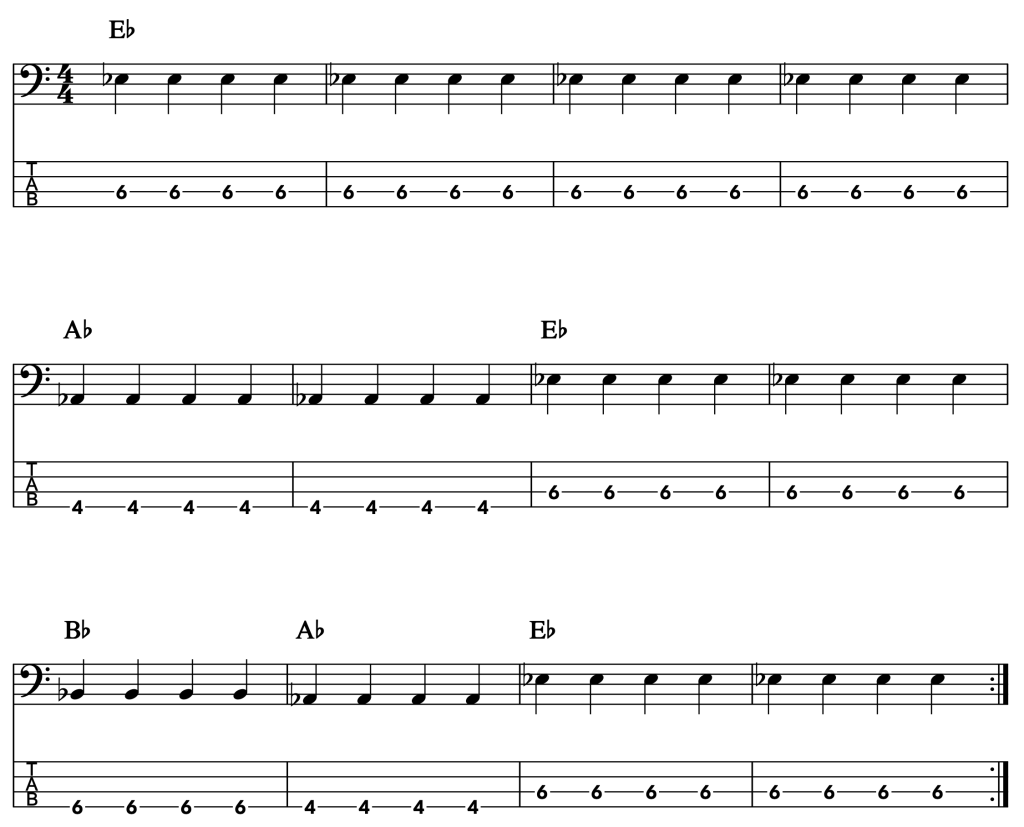
The next tune is Stevie Ray Vaughan’s “Pride and Joy”. This was his first ever single, released in 1983, and features SRV’s backing rhythm section, Double Trouble, and the ever solid bass playing of Tommy Shannon.
Here’s the chart:
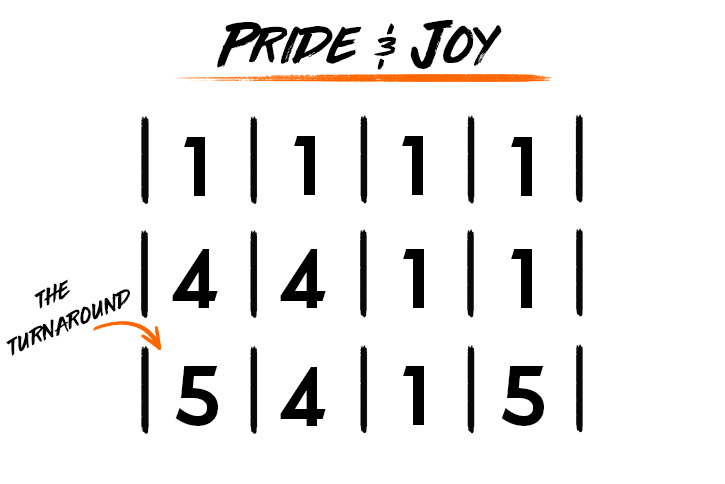
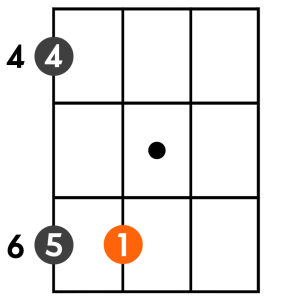
Once again, the key is different. For this song use the low survival shape in the key of Eb.
Roll through your 12 bar blues survival check list here before you dig in to the track:
- Find your 1 – the key you’re in (Eb). (6th fret A string)
- Find your shape (We’ll use the low shape here)
- Find your roots for the 1, 4 and 5 chords
- Review the 12 bar chord progression
- Double check the turnaround (and notice that this blues, like Killing Floor, goes to the 5 in the last bar of the turnaround!)
- Listen to it and follow along with your ears.
And then go for it:
With this simple survival shapes, a bit of practical theory, and 12 bars on infinite loop, you’re a blues playing juggernaut. Well done. Never again will you have to live in fear of the awkward, sweaty-palms blues jam.

Comments
Got something to say? Post a comment below.