TLDR:
If you’re the internet searcher who just wanted some damn bass chord shapes, here you go.
If you wanna learn what chords are made out of, what songs actually use chords, and how to use chords responsibly in real life, read on.
What You’ll Learn
In this article you will learn:
12 practical and useful chord fingerings.
Real songs that use these chords.
The 3 rules for how, why and when to use bass chords.
How to be a bass chord playing model of taste, restraint and beautiful harmonies.
Proper left and right hand technique for chord playing.
#1What Is A Chord?
For the purposes of this article, a chord is more than one note played at the same time.
Music theory folks will claim that a chord is 3 or more notes. We’re ignoring them right now.
#2The Golden Rules Of Bass Chords
If bass chords are so beautiful, sound so incredible, are so damn fun and satisfying to play, why don’t we get to use them more?
Because there are three golden rules to using bass chords in songs, and they must be followed in order for you to avoid getting busted by the Wank Police.
Golden Rule #1
Groove Above All
If the song needs more something, it probably needs more groove, not more notes.
Chords = more notes and, thus, are rarely the solution for song-supporting bass playing.
Golden Rule #2
Stay Out of the Mud
Too Low = Muddy Chords.
Because the bass is in such a low register, lots of chords don’t sound great on the bass. Low frequency notes move slowly and have a ton of sonic information in them. When you start stacking these low, slow, dense sounds on top of one another, the sound gets muddy, unclear, and our ears can’t pick out the actual notes being played.
Golden Rule #3
The Primacy of Lowness
Too High = Where’s the Bass?
To avoid muddy chords, bass chords can be moved higher up the fretboard.
Bass chords sound great if they’re played up high, where the frequencies are faster, and our ears can figure out all that great chord information.
But.
The bass is usually in the ensemble to provide the rich, luscious, necessary low notes and vibrations.
Most songs and bands can’t spare the sweet low sounds for the bass to go up high and play chords, because the keys or guitar are already doing that.
So, if you do play a chord, make sure the bass role is still being honored.

For more low-end goodness check out our complete beginner bass course.
#3The Power Chord
2 note chords and the bass are best friends.
They’re clean, clear, and still contain mountains of harmony for your ears to soak up.
And the most famous, rocking, and (ahem) powerful of the 2 note chords is The Power Chord.
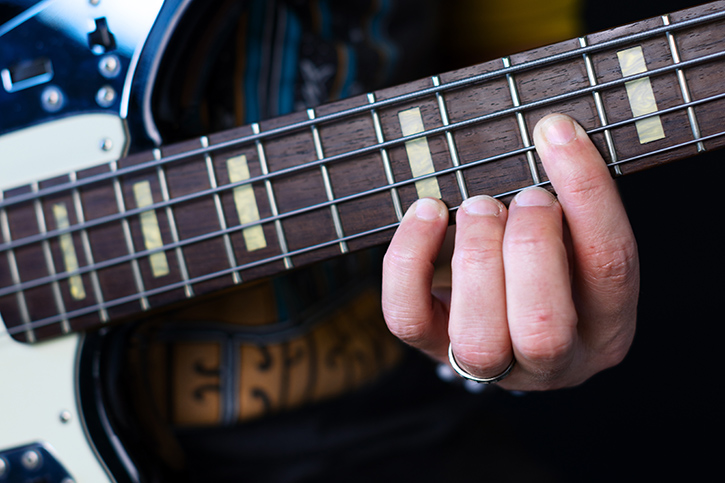
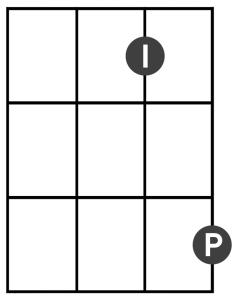

In technical terms, this is a two note chord (also called a dyad) made out of a root and a fifth.
This means that the chord uses the ROOT note of a major scale and then stacks the 5TH note from the major scale on top of the root.
Play them together = a power chord.
Root + 5th.
If you have any trouble getting the chords to sound good, you may need to adjust your technique. Technique tips and advice are at the very end of this article.
Songs that use power chords
Don’t Forget Me
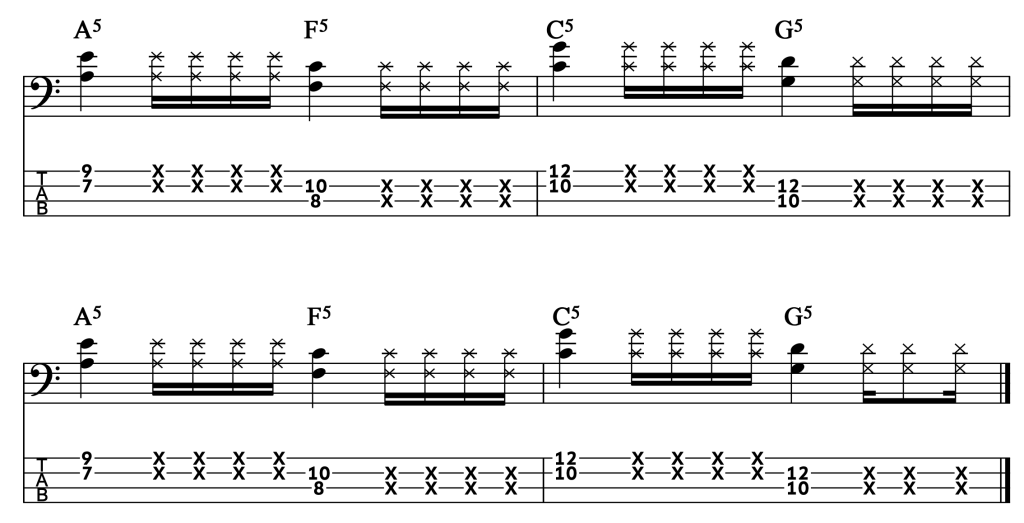
Flea (bassist in the Red Hot Chili Peppers) uses simple power chords for Don’t Forget Me.
All I’ve Got to Do
Sir Paul McCartney throws down a few power chords in the very first part of each verse from The Beatles’ song All I’ve Got To Do:

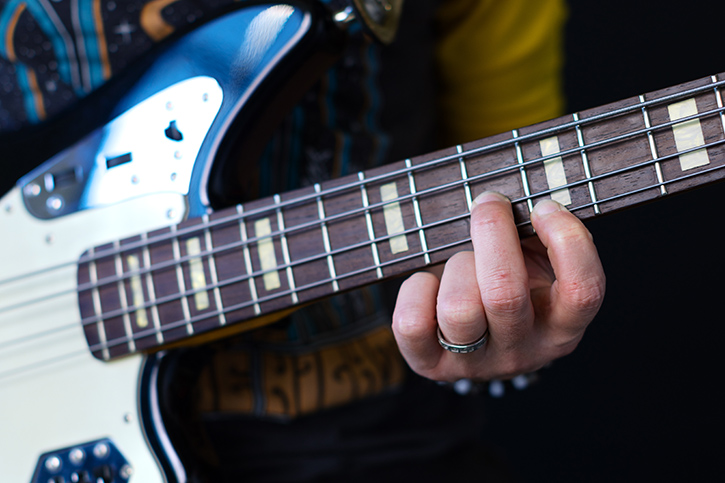
Once you get this shape to feel comfortable, move it around on your bass. It sounds amazing just about everywhere. In my experience, it gets into Mud land right around your low B – the 2nd fret of your A string, or the 7th fret of your E string. Below that, it can be too rumbly and mooshy (technical terms) to hear. But everywhere else is all power and glory!
#4Major And Minor Thirds
Power is great, sure. But what about beauty? Love and joy and sadness? Welcome to the world of thirds.
This two note chord is made with the root and third of the corresponding scale:
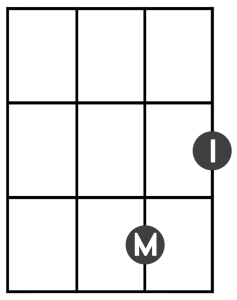

A major third starts with the root, and then stacks the third note of the major scale on top.
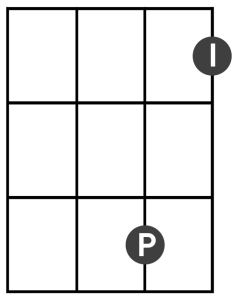

A minor third starts with the root and then stacks the third note of the minor scale on top.
If you’re rusty on your scales, check out this lovely and very in-depth article.
Songs that use thirds
(And Power Chords Together!)
Fight Fire With Fire
The intro to Fight Fire With Fire, (the first song on Metallica’s album Ride The Lightning) is a beautiful example of thirds on the bass. Thanks again, Cliff Burton.

Schism
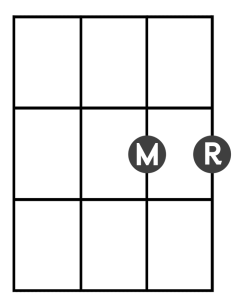
Justin Chancellor’s intro to Schism by Tool uses power chords, thirds, and he even throws in a new one – the fourth.
Root of chord + 4th note from the major scale:


Carousel
Mark Hoppus from Blink 182 uses some downright lovely thirds in the intro to Carousel.
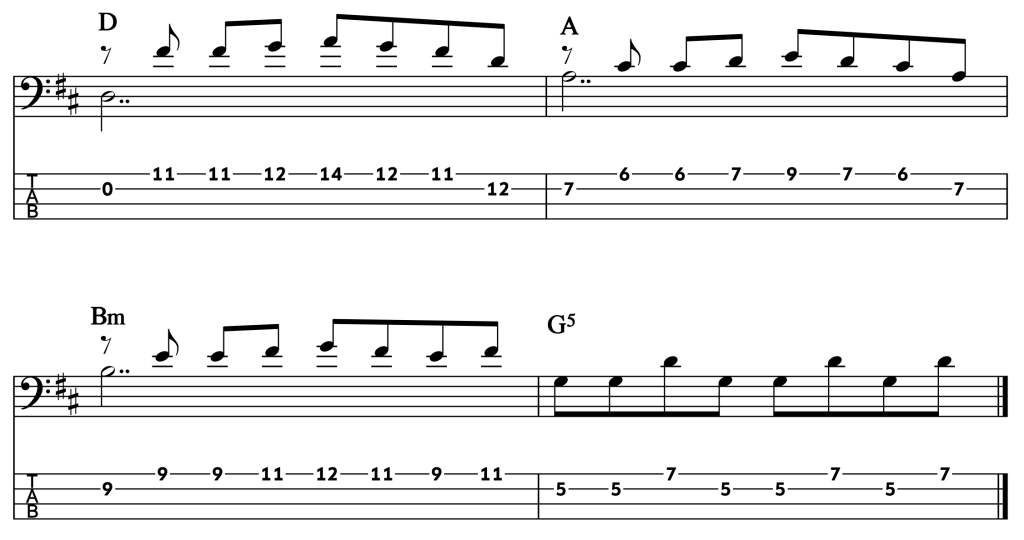
He starts with a D major 3rd, and plays a little bass melody up to a D power chord and then back down.
If he played the first bar of the intro with the shapes you learned above, it would look like this:

But, alas, this version breaks Golden Rule #3 – The Primacy of Lowness.
How to get that great bass melody, but still keep the low notes that our instrument – and only our instrument – can deliver?
ENTER: THE MAGIC OF OPEN STRINGS!
Instead of playing the D root of the D major third on the 12th fret of the D string, he plays it on the open D string. The notes are the same, and so the chord is the same and now the low end is back in the bass line.
Here’s how Mark actually plays it:

#5Major And Minor Tenths
To pick up where Mark Hoppus left off – the sound of that low root and that high major (or minor) third is a truly wonderful sound.
We keep the sweet low note that the people want from our basses, but we add the gorgeous harmony that we want to hear.
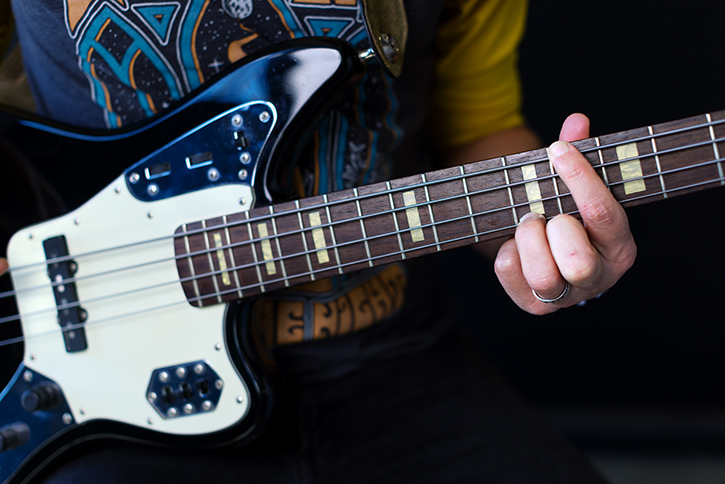
These chords have the same notes as the major and minor thirds. The difference in sound and name comes from the change in the distance between the notes.
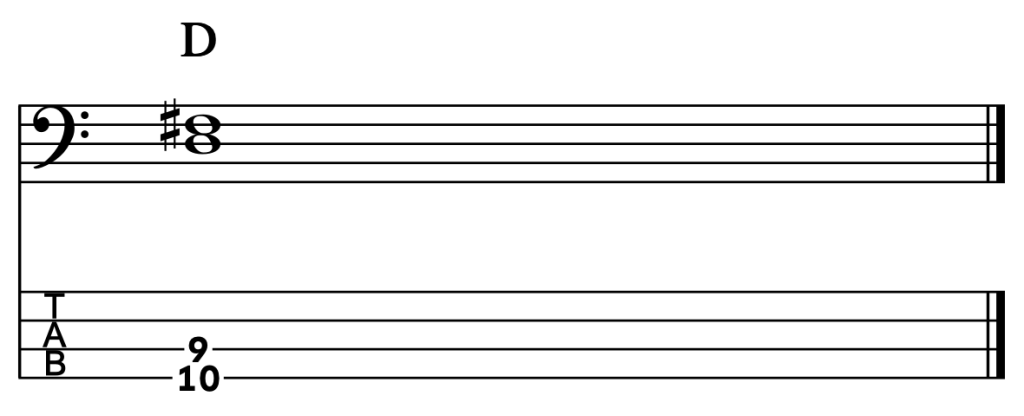
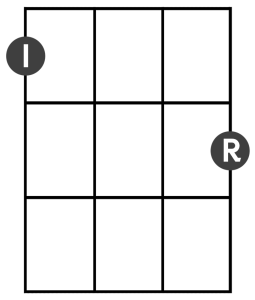
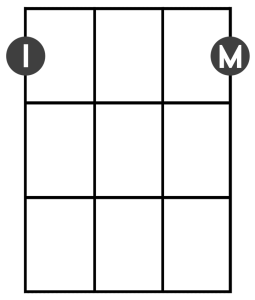
A tenth is a third one octave higher. Same notes, different way to play them.
In the example below, a D major third would be played thus:
If you take that 3rd note and move it up an octave, it becomes this:
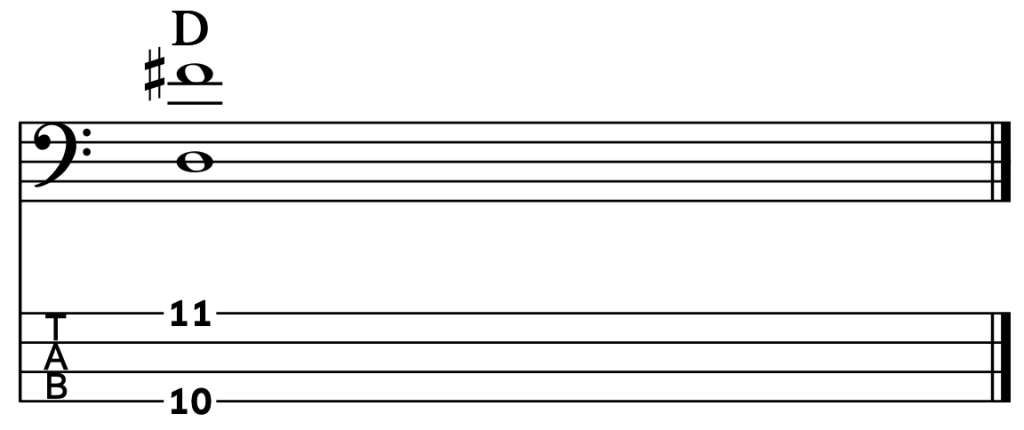
This big open spacing for chords works out great on the bass. Plenty of room for the low notes to do their bass thing, plenty of room for those high harmony/melody notes to do their thing.


Songs that use tenths
Watermelon Man
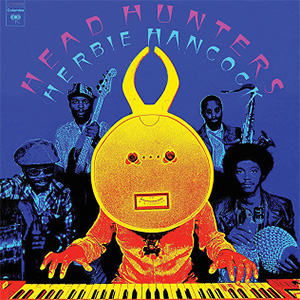
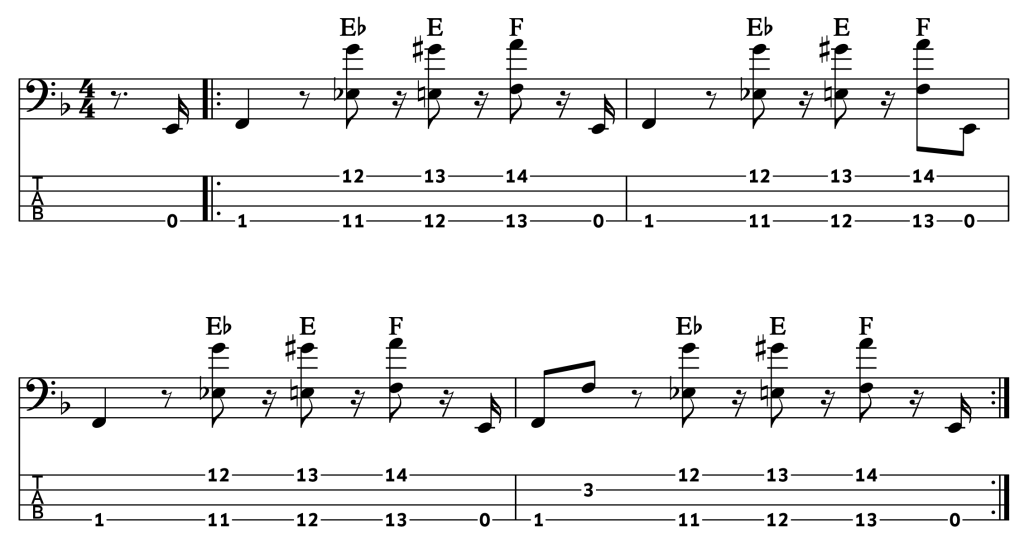
Paul Jackson, funk lord supreme and bassist for the Headhunters, played this bassline for Watermelon Man. Check out those major 10ths!!
Heaven Knows I’m Miserable Now
Check out Andrew Rourke’s killer use of 10ths snuggled deep into The Smith’s Heaven Knows I’m Miserable Now:
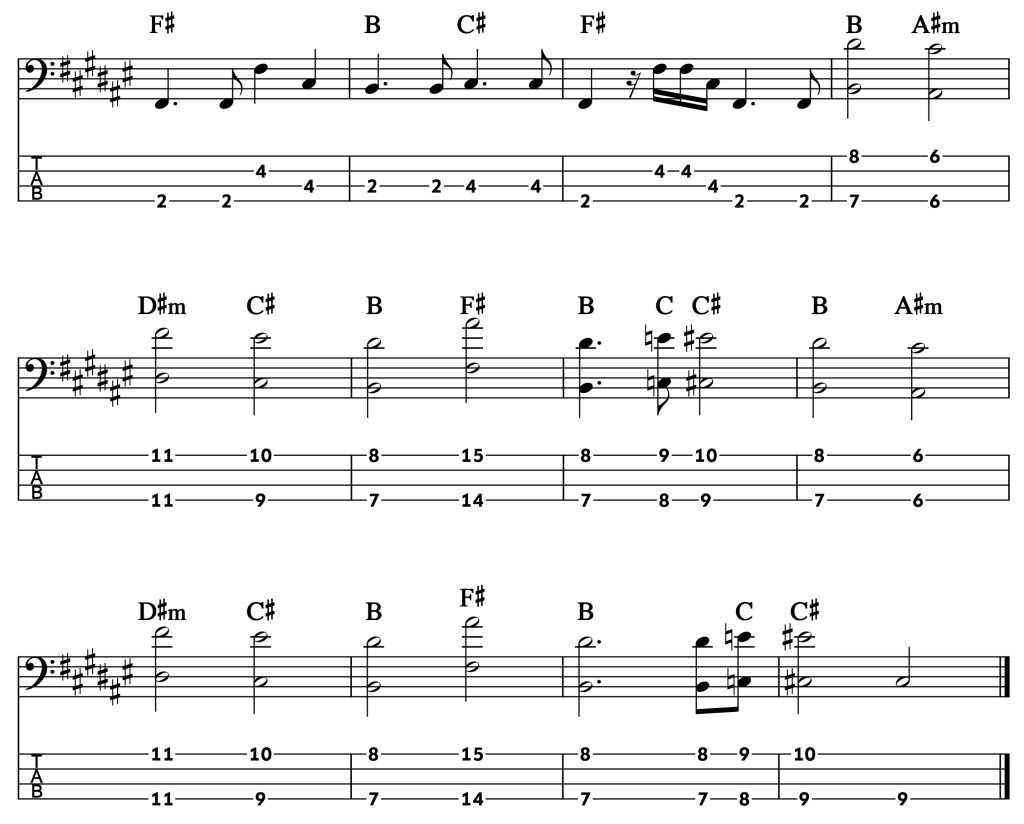

In case that playalong (and Morissey) got you sad, cheer yourself up by checking out our completely free Kickstart Course!
#6Major And Minor Triads
The world of 3 note chords is a much more complex and challenging place than the land of 2 note chords.
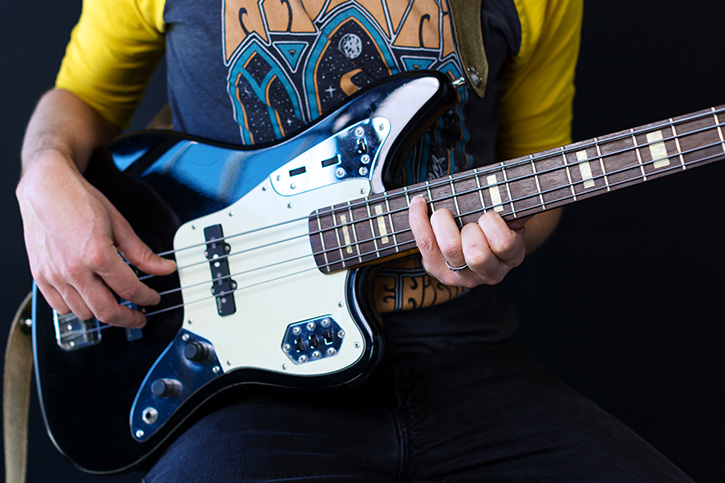
The bass’ longer scale length, giant strings and wider string spacing make playing 3 note chords challenging. Playing chords with more notes in them and having it sound good while not breaking the Golden Rules is very challenging.
Before you go through the chord shapes and TABS for the major and minor triads, you need to answer an important question for yourself.
Have you spent quality time with your pinky recently?
If you’ve been ignoring some important pinky work, it will show! You’re gonna need that pinky!!
The major and minor triad are built starting with thirds.
For a major triad – start with a major third, then add the 5th note from the major scale.
For a minor triad – start with a minor third, then add the 5th note from the minor scale.
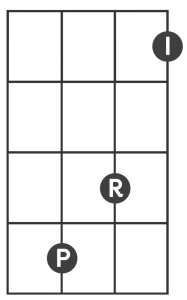

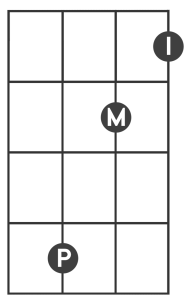

Not easy stretches for anyone.
(Again – if you are looking for some chord playing technique tips, scroll to the end of this article. They’re there.)
Why is the 5th of the chord in this new, weird, too-far-to-stretch place?
When playing chords, you can only hear one note per string.
The old way of playing the root and 5th (the power chord) would be taking up the same string as our major or minor third.
To play all three notes – the root, the third (major or minor) and the fifth, you need to find a new place and new string for the 5th.
Thus the triad shape.
There is another way to play these. You can smash together two other shapes – the power chord and the major (or minor) tenth:
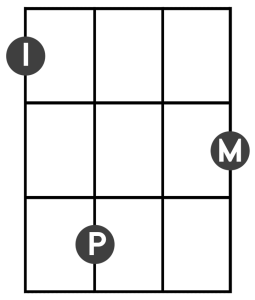

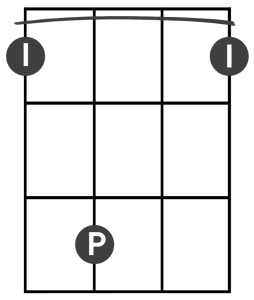

If we start with the root and the 5th in the power chord shape, now we need a new place and string to play the 3rd.
If you play a power chord on the E string and put the major or minor 10th on top (on the G string) now you have another way to play the triad.
As long as the LOWEST note of the chord is the ROOT, you can change where you play the 3rd and 5th, and you’ll still have a major or minor triad.
Triad Example
Here are two ways to play the chord progression from Pachelbel’s Canon in D.
In this first attempt, every chord has its root note on the A string:

For this next option, you’ll use a combination of triads with the root note on the A string and the E string. The change of chord fingerings makes a huge difference for two reasons.
Reason 1: Now each chord is closer to the other chords around it and thus easier to play.
Reason 2: The new way to play these chords changes the highest note in each chord to sound more like the original melody.
It pays to have options!


#77th Chords
Learning bass chords isn’t just about using them in songs. They can also help you hear what chord progressions sound like, so you can play better bass lines.
With these chord shapes, you’ll have a quick and dirty way to hear and play most sets of chord changes, no matter how complex or difficult.
The Major 7 Chord
The ingredients of a major 7 chord are: root, 3rd note from the major scale, 5th note from the major scale + 7th note from the major scale.
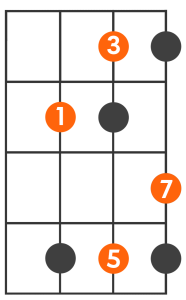
Due to the way our instrument is constructed and tuned, playing these 4 notes is rarely – if ever – a good option… Or even physically possible.
Instead, we have to select 3 of the 4 ingredients and leave one out.
The note we’ll leave out is the 5th of the scale.
The 5th is great for powerful rock and roll, but it doesn’t add much color or harmonic information to our chord. Of all the options, this is the best choice to leave out.
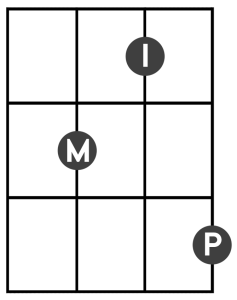

And, once again – if we begin with our shape of the major 10th, we can play the same 3 notes: root, 3rd note of the major scale + 7th note of the major scale – like this:
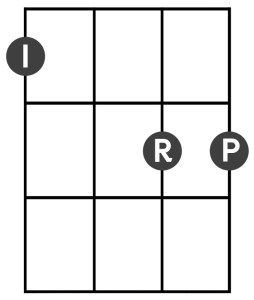

This chord shape can be used as a simple way to play the following chords you may find on a song sheet:
- Maj 7
- Maj 9
- Maj 7 #11
- Maj13
- Maj13 #11
Dominant 7 Chords
The ingredients here are: root note, 3rd note of major scale, 5th note of major scale, 7th note of MINOR SCALE (also referred to as a flat 7).
Again, when we work out how to play this on bass, we’re going to leave out the 5th note of the scale and play only the root, 3rd and flat 7.
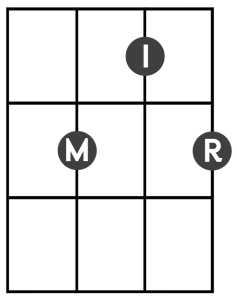

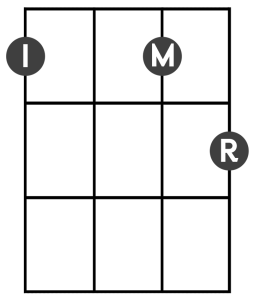

This chord can be used as a simple way to play these chords you may find on a song sheet:
- 7
- 9
- b9
- #9
- #11
- 13
- Alt
- 7(b5)
- 7(#5)
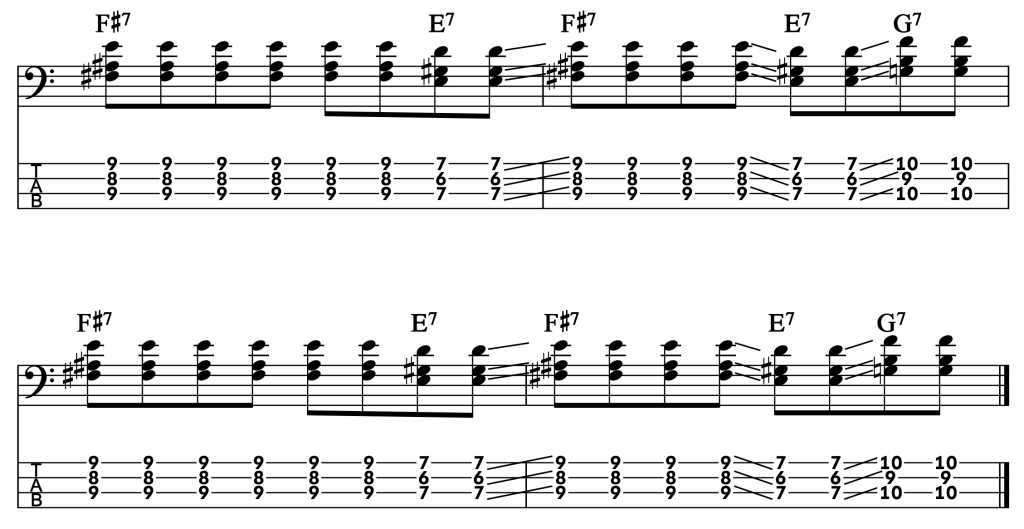
Check out Les Claypool’s intro to Golden Boy (from Primus’ The Brown Album). It’s all this chord shape:
Minor 7 Chords
The ingredients for this chord shape are: root, 3rd note from the minor scale (also called a flat 3 because it is one half step lower than the 3rd note of the major scale), 5th note from the minor scale + 7th note from the minor scale (flat 7).
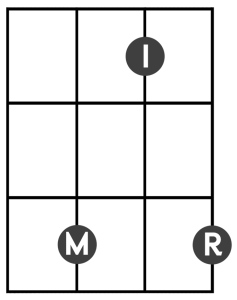

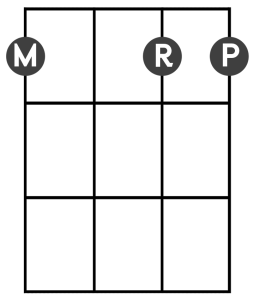

This chord can be used as a simple way to play the following chords you may find on a song sheet:
- min7
- -7
- m7
- Min9
- Min11
- Min13
Using These Chords
One of the greatest benefits of having these chord shapes under your fingers is the ability to hear and play chord progressions.
Here’s a killer example of how you can use these chord shapes to really hear what the full band is doing – not just the bass player.
In The Ghetto by soul legend Donny Hathaway, the bassist, Willie Weeks, plays this killer bass line:

We bassists are usually playing cool bass lines, but not always paying attention to those chord symbols hovering over the top of the music.
Now that you know all these chords, you can play both the bass line and the chords.
If you wanted to play chords to The Ghetto, here are two recommended chord fingering options:
If you start with a Bb minor with your root on the A string, you get this:


If you bring it down and play a Bb minor with your root note on the E string, this most convenient Eb7 chord changes as well:


For another good chord example, let’s take the first four bars of the jazz classic (as made most popular by Mr. Frank Sinatra), Fly Me To The Moon.
Here is what the first 4 bars of music would look like if you were to encounter it in a song book or out on a gig:

Traditionally, when playing jazz, it is assumed you know how to improvise a walking bass line that fits the chords shown above the melody.
It’s OK if you can’t – I’ve transcribed the recorded walking line from Sinatra’s version right here:

Now that you know these chords, you can play through the harmony to hear the full context of what’s happening in the song, rather than just playing the single note bass line.
Here are two ways to play it.
Variation 1 – with first Am7 chord with a root on the A string:


Variation 2 – with the first Am7 chord played with a root on the E string:


Technique Tips
In order to get multiple notes to ring out at the same time you’ll have to adjust how you play with both your fretting hand and your plucking hand.
As in every technique lesson – use this as a starting point, and then adjust to your body from there.
The Fretting Hand
1. The fingers
In order for any note to ring out, the string has to be free and clear of any pressure or contact between the fretted note and the pickup. (What you do behind the fretted note – meaning between the nut of the bass and the fret – isn’t going to be picked up and amplified, so don’t worry about that.)
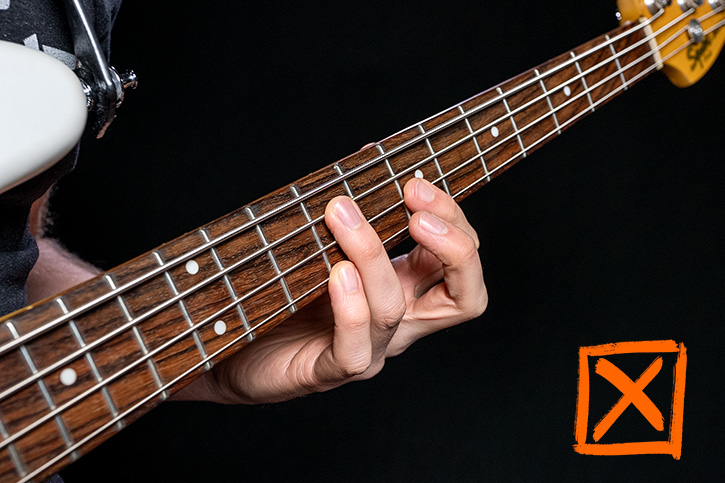
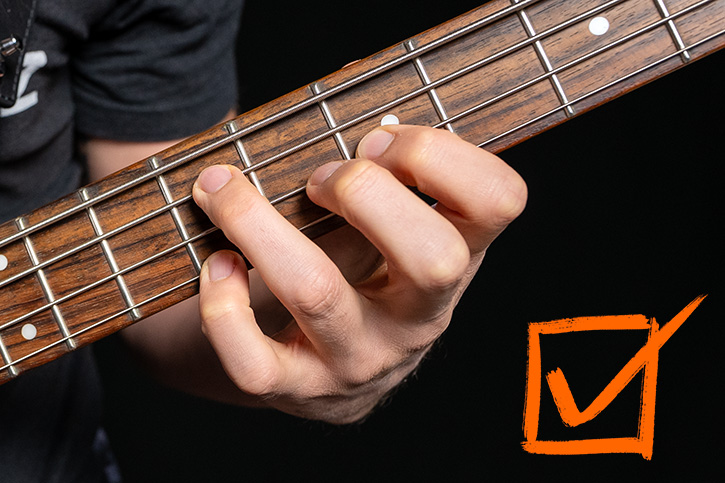
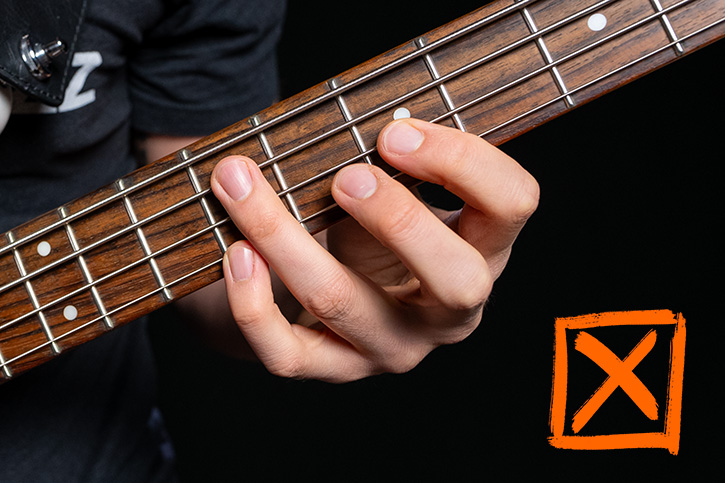
If you want two notes to ring out together, you have to be careful that no part of your fretting fingers are obstructing, muting, or otherwise touching the strings in any place except where you are fretting them.
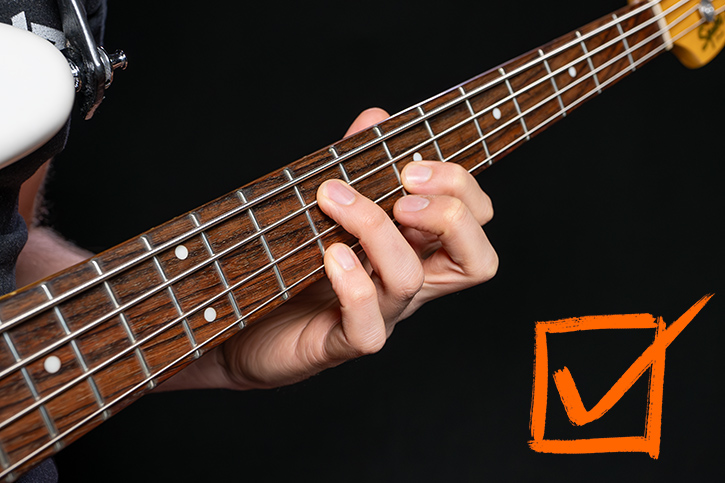
To get accurate and clean contact with multiple notes at the same time, your fingers will have to curl down to the fretboard and fret the bass with the fingertips only. No straight fingers, no fingers smooshing down on multiple strings.
2. The hand & wrist
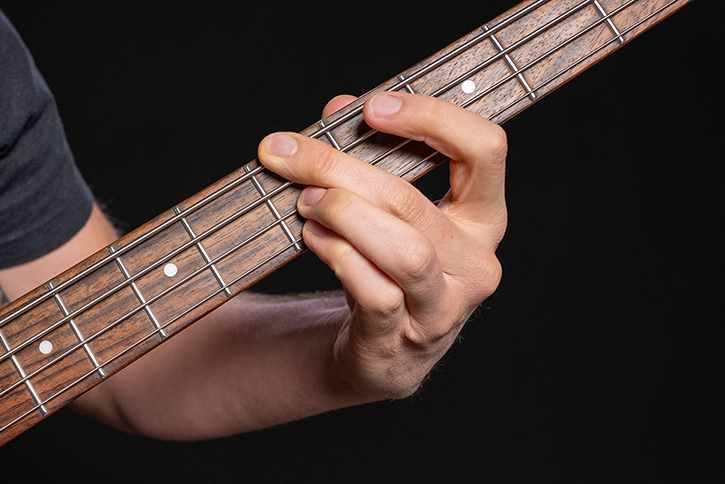
When you want to play chords, you’ll sometimes be asked to play notes on separate strings but the same fret – essentially stacking up your fingers.
The way to do this with good technique, flexibility and maximum efficiency is to angle the wrist a bit.
The movement starts at the shoulder – pulling the elbow slightly away from the body. This allows you to roll the pinky side of your fretting hand away from your body slightly. When you do this, your fingers move from being in a nice horizontal row to being more of a stack or column, making it easier to access some of the chord fingerings you’ll find here.

Plucking Hand
When you use traditional plucking technique, your fingers follow through the string to rest on the next thicker string.
This won’t work out great for chords, as when your fingers rest on that string, they will be muting it.
We’ll go over 3 options for your plucking hand so that you can play 2,3, or even 4 strings at a time and have them all ringing out together in glorious, massive harmony.
Option #1
Fingerstyle Guitar technique
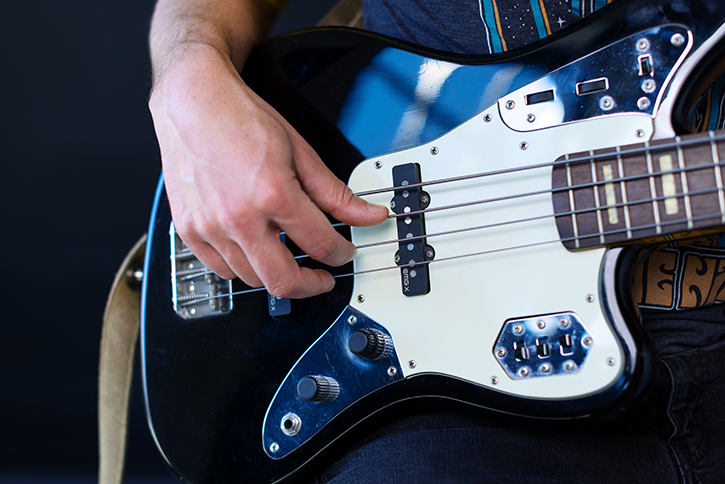
To do this, use the thumb of your plucking hand for the low string of your chord, and then add as many of the fingers of your plucking hand as you have extra notes in your chord.
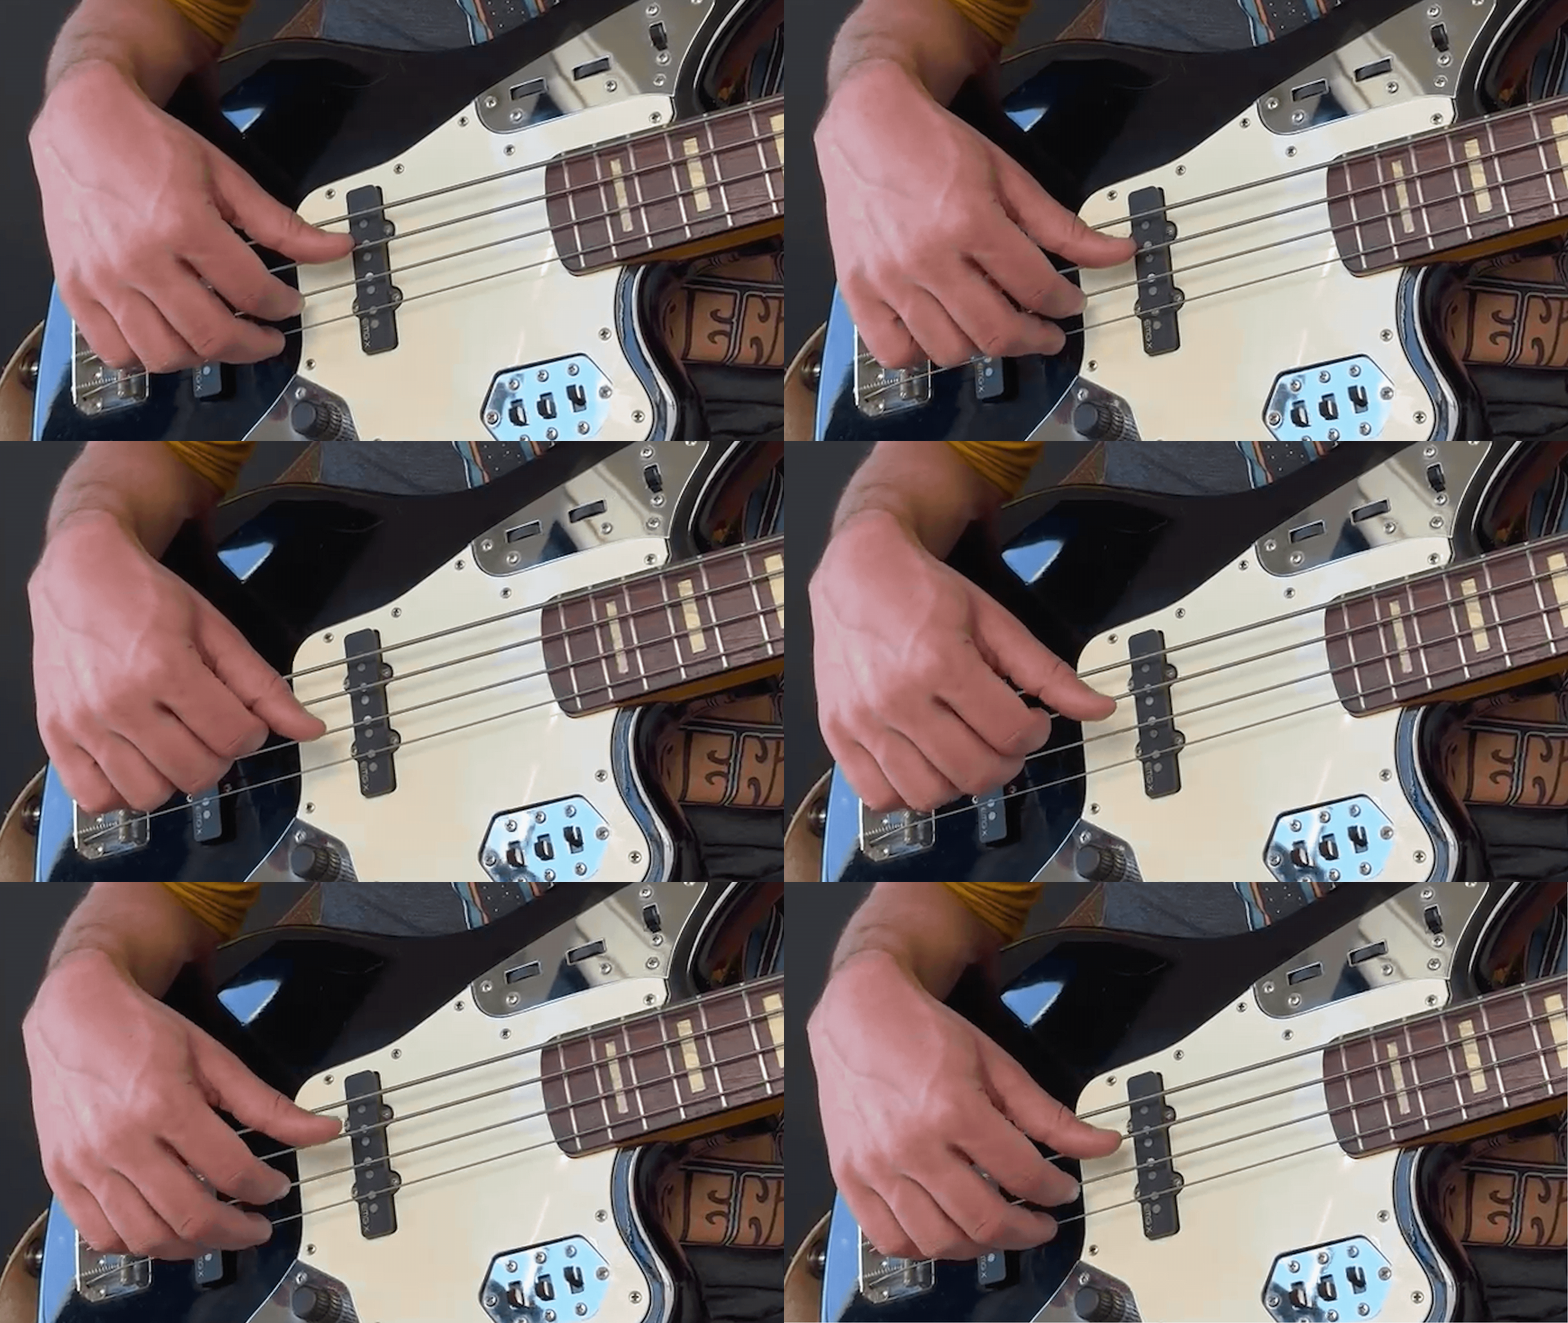
For a 2 note chord, use thumb and index – thumb on the lowest note, then index.
For a 3 note chord, use thumb, index and middle finger, thumb on the lowest, then index, then middle.
For a 4 note chord, use the same approach, and add the ring finger.
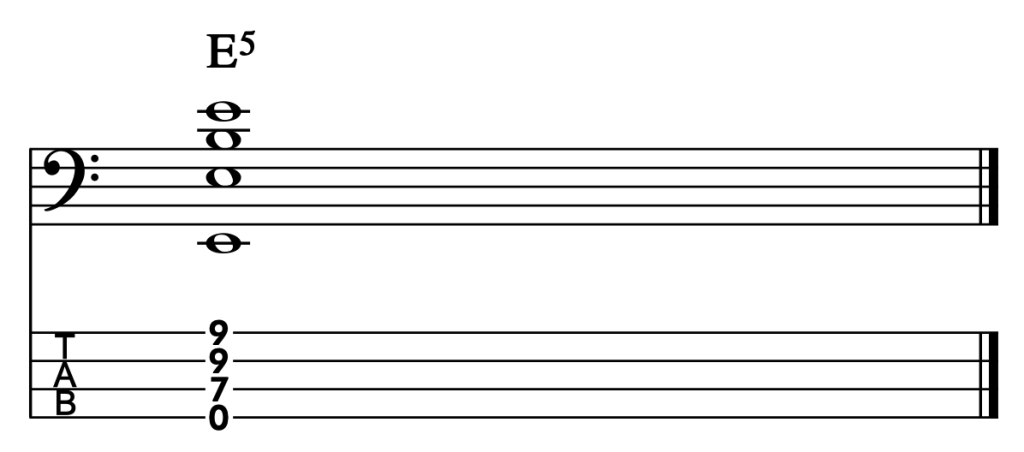
(I realize I didn’t write any 4 note chords, so here’s a personal favorite: The Mega E Ultra Powerchord)
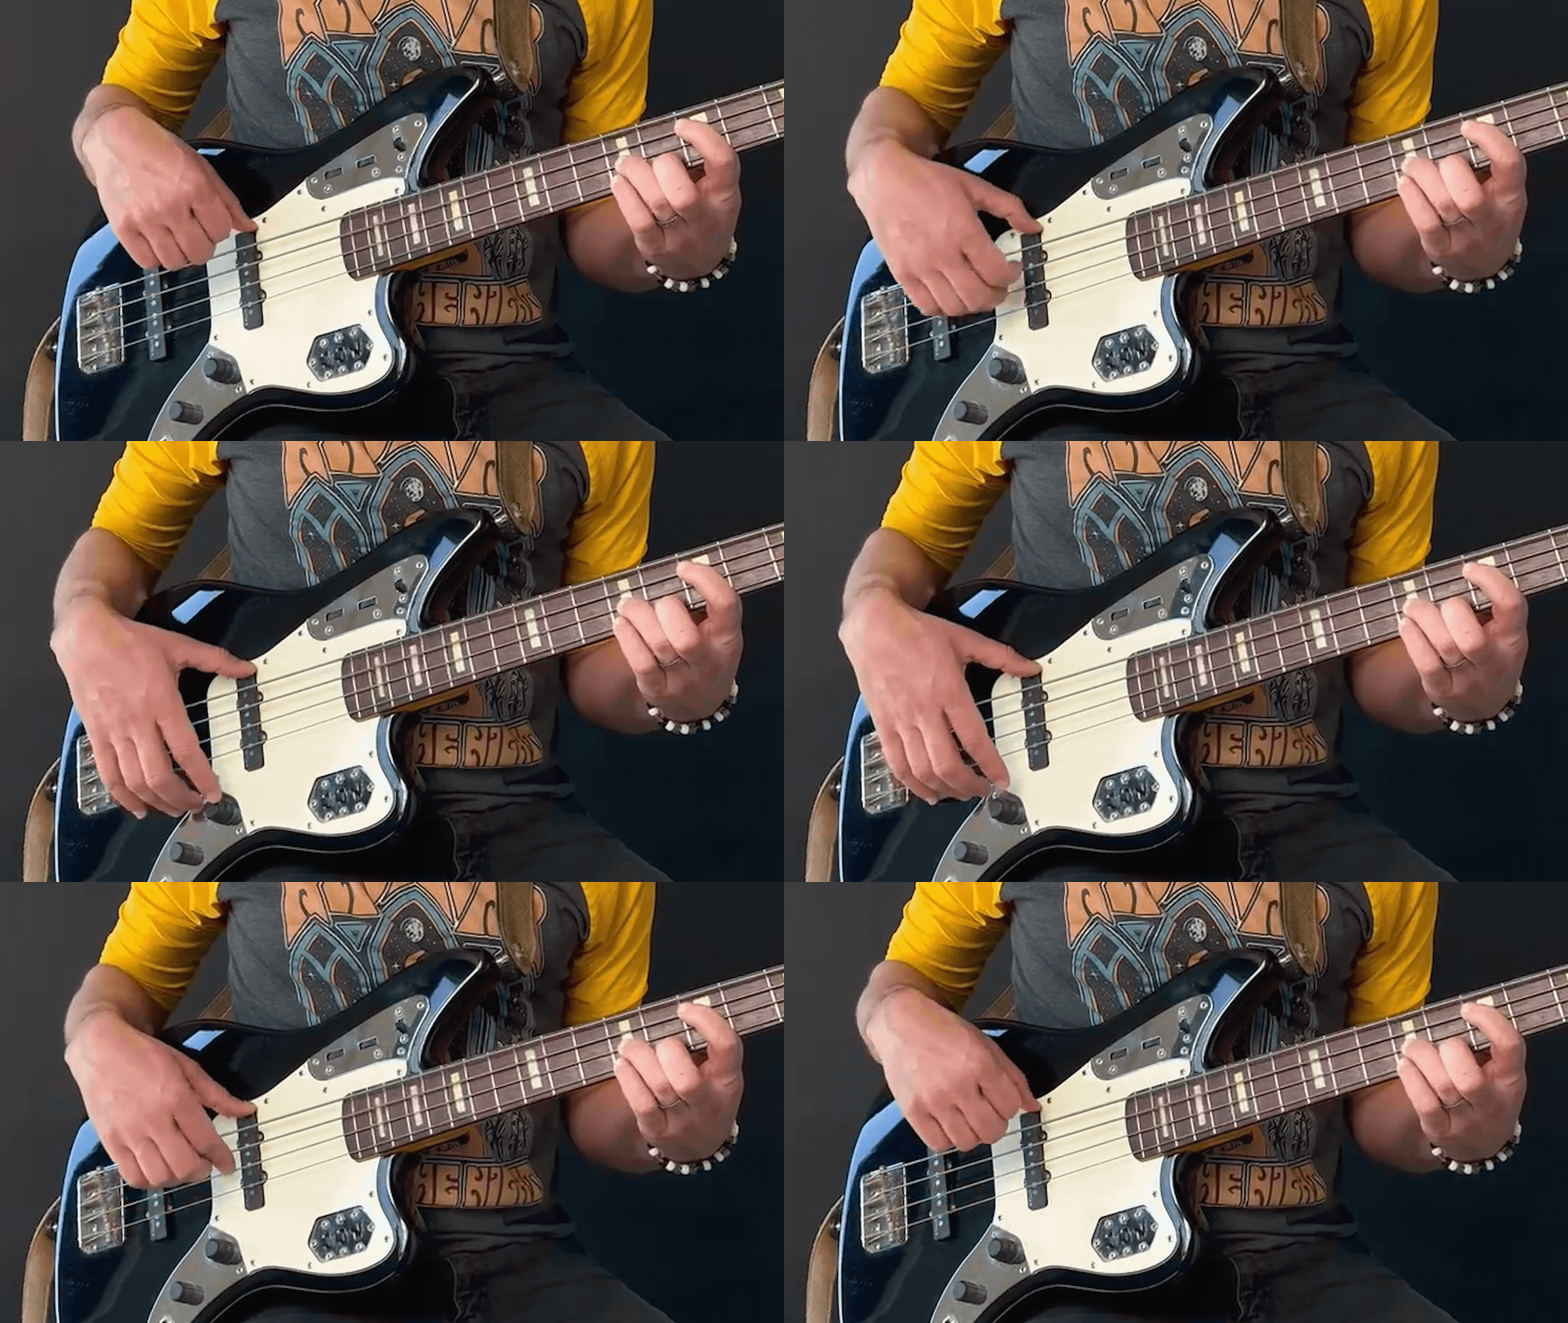
When you’re plucking strings with this fingerstyle technique, your fingers will come up, through the string and away from your bass. THE OPPOSITE of good single-note technique.
Option #2
Grab A Pick!
Picks are great for playing chords.
Debates rage over the proper way to hold a pick.
I hold my pick between my thumb and the pads of my index and middle finger. Some say to hold the pick between your thumb and the side of that topmost joint of your index finger.
I say – hold it how you can, and how it’s comfortable.
As a rule of thumb, strong beats will be a down stroke (moving your strum towards the floor) and weaker beats will be up strokes (moving your strum towards your chin).
Option #3
The Finger Strum.
Start from a very loose fist position and then flick the fingers down and across the strings.
This is the equivalent to a down stroke with a pick.
For the up stroke – coming back toward your chin – use your index finger, and quickly strum across the strings.
Les Claypool of Primus uses this technique to create a constant strumming action on his bass.
Conclusion
You now have the power to play bass chords.
When and how will you use this power?
Will you obey the Golden Rules? Will you sneak the occasional chord into rehearsal and see what kind of stink eye you catch? Will you turn everything all the way up and just blast massive bass chords all the live long day?
I hope so.
Go forth with your chord powers and enjoy the lush, deep, glorious harmony of your instrument.


Comments
Got something to say? Post a comment below.