
Welcome to your first ever bass lesson.
You’re good at skiing, programming, carpentry, fishing, video games, gardening – whatever.
You are a noob bassist.

So, before this absolute beginning first bass lesson, relax. Take a deep breath. You’re not supposed to know any of this. You’re not supposed to be good at any of this. You are supposed to be very very bad at the bass right now.
Every single player starts out there. For me, it was when I was 12 at my friend Nat’s house.
Nat put an electric bass in my hands and asked me to play some thrash metal riffs he had written. It was impossible. The strings were too big, the riffs were too fast – it was a mess. If only there had been some easily available resource that could have gotten me over that massive new-bassist hurdle…
(cue trumpets) And now there is!
This First Ever Bass Lesson article and I are here to help.
I’ll give you 7 steps to go from total noob to playing your first song.
You’ll start with playing position and gear essentials, then dive into plucking, fretting and groove.
I may not be able to help 12 year old me as I flailed my way through early 90s thrash metal riffs, but it’s not too late for you.
#1Plugging In
When I said we were starting from the point of total newbie, that’s what I meant. I’m assuming that every single aspect of electric bass playing is new to you.
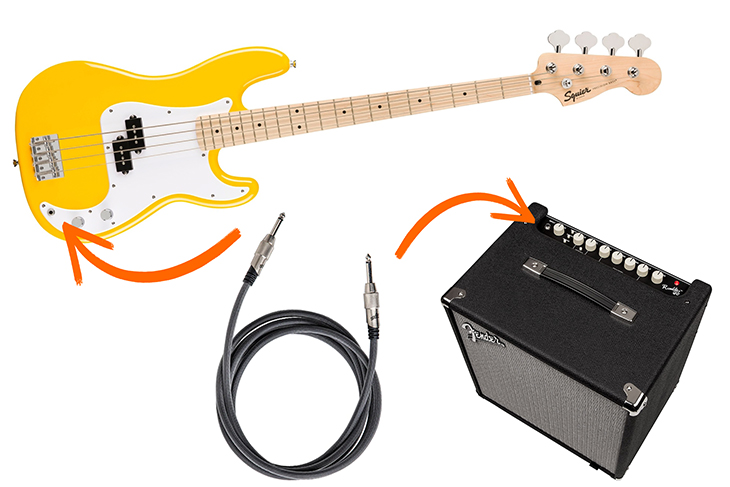
And so – step 1. Before you worry about making sound, how to position your hands, etc., you need to plug in your bass to an amp with a cable.
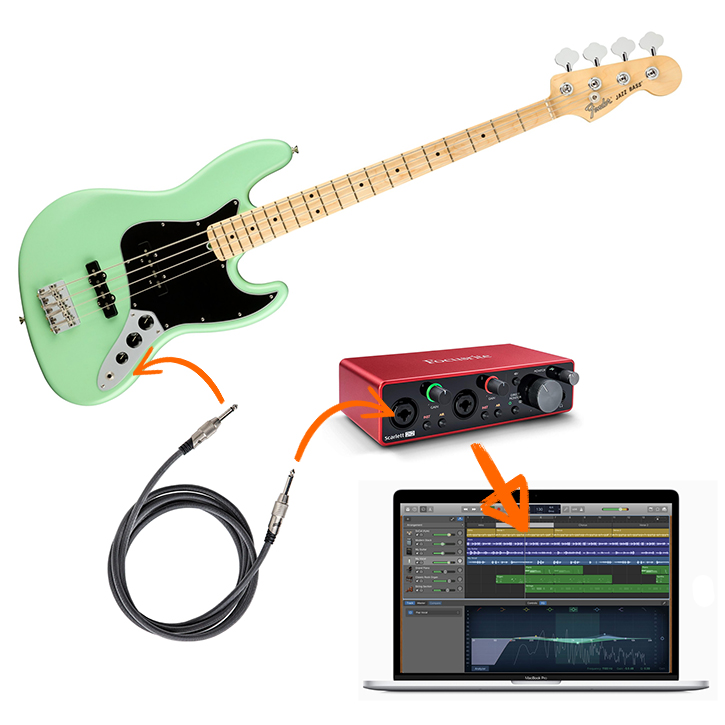
For The Headphones / Bluetooth / Interface Users Click Here
I know a whole lot of you out there aren’t using amps. You’re either using some groovy bluetooth-device plugged into your bass straight to your bluetooth headphones…
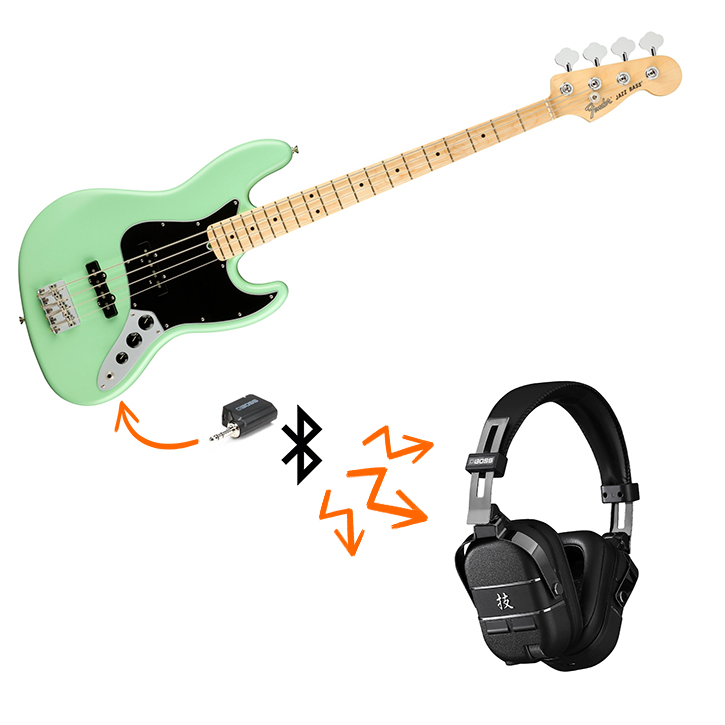
Or – you’re plugged into some sort of audio interface so that your bass can plug in to your computer, and you’re using headphones with your interface…
Or – you have yet another headphone-related setup that I don’t know about or hasn’t been invented while I write this.
So, all I can say for any technology beyond turning on an amp is – I hope it works because there are too many variations and variables for me to try and assist here. Personally, I love the sound of bass out of an amp where I can feel the air moving (even if it’s quiet). But I absolutely respect and understand the need for headphones (most of my playing is done once the kids are asleep).
So – yes, playing with a headphone setup is great if that’s what you have.
I won’t be able to walk you through it, so hopefully whatever you got came with a good customer service department.
You should practice amplified most of the time so you can hear yourself the way other people would hear you.
![]() Important note here – make sure the amplifier is PLUGGED IN, but NOT TURNED ON at this point!
Important note here – make sure the amplifier is PLUGGED IN, but NOT TURNED ON at this point!
Find the jack (place where the cable plugs in) on the body of the bass. It may be on the top (where all the knobs and strings are) or it may be on the side (where the strap button is).
Plug the cable into the bass. Either end of the cable will work. It doesn’t matter.
Plug the other end of the cable into your amp.
There may be lots of potential places for the cable to go on your amp. Make sure you place the cable into the jack labeled “input”.
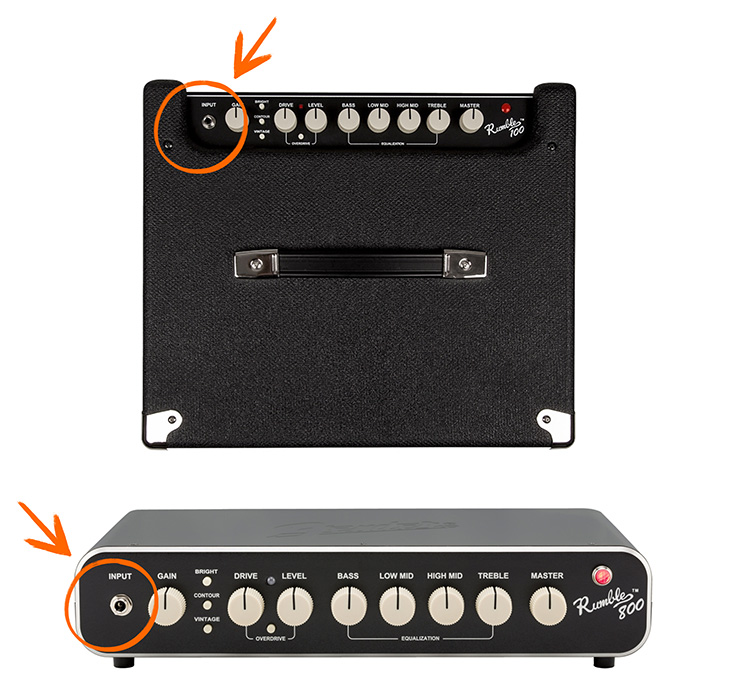
Now it is safe to turn on the amp. Switch it on.
You should now, hopefully, hear some bass coming out of the amp. Hopefully it sounds good. If it doesn’t sound good / is too loud / is too quiet, it means you need to adjust some knobs.
Which, luckily for you, happens to be step 2.
#2Twiddle The Knobs
Depending on what bass you have and what amp you’re using, there could be up to, approximately, one billion knobs to adjust.
Do not panic.
If you can operate a motor vehicle or a modern video game you have more than enough skill to master the array of knobs before you.
To get started, you don’t have to know everything about every knob. You only need to know enough so you can make sound that isn’t terrible.
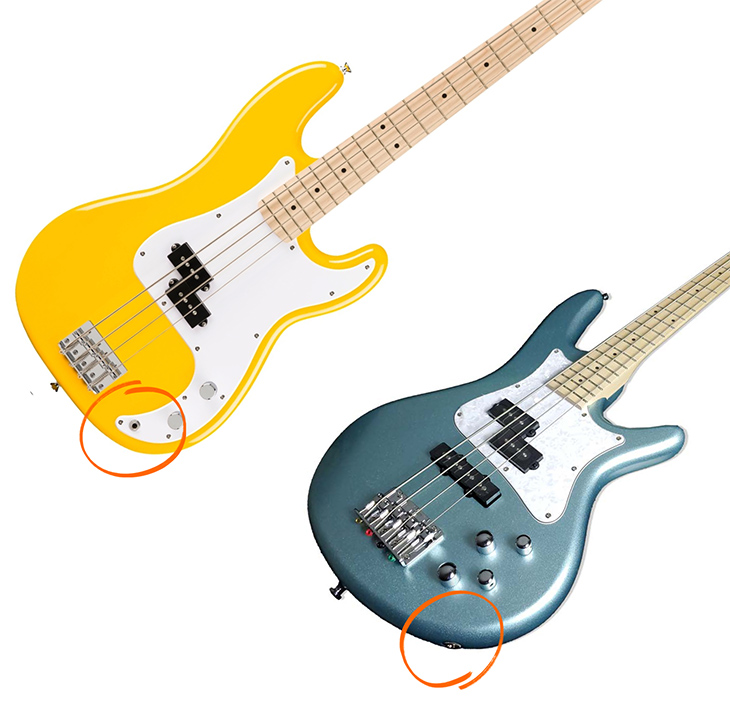
First – the knobs of your bass

Different basses have different knob situations.
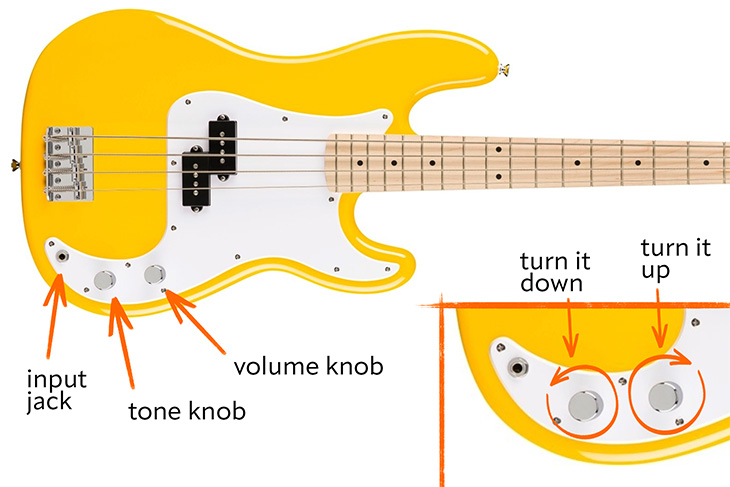
On a Precision style bass, or “P bass,” you’ve got 2 knobs. The one closer to you is volume: clockwise turns the volume up, counterclockwise turns the volume down. The other knob – the one further away – is a tone control: counterclockwise gives you a darker, more muffled tone, clockwise gives you a brighter, chime-ier tone.
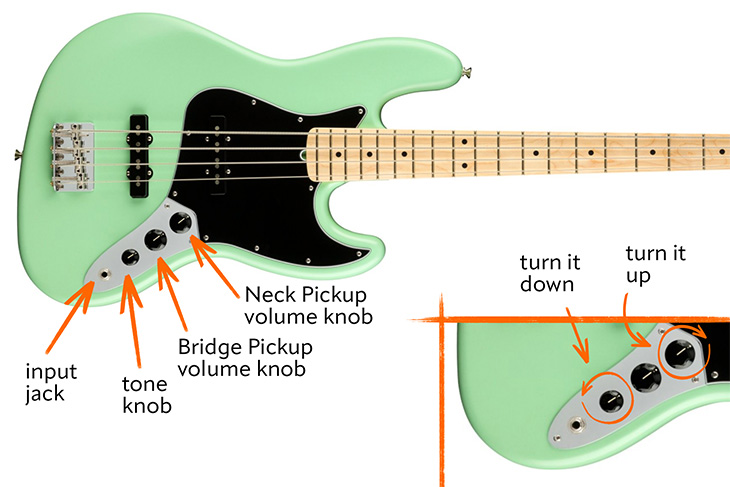
On a Jazz style bass, or a “J bass”, you’ve got 3 knobs. The knob closest to you controls the volume for the pickup closest to the neck (called the neck pickup). The middle knob controls the volume for the pickup closest to the bridge (called the bridge pickup). The third knob is the tone control and it does the same thing as the tone knob for a P bass.
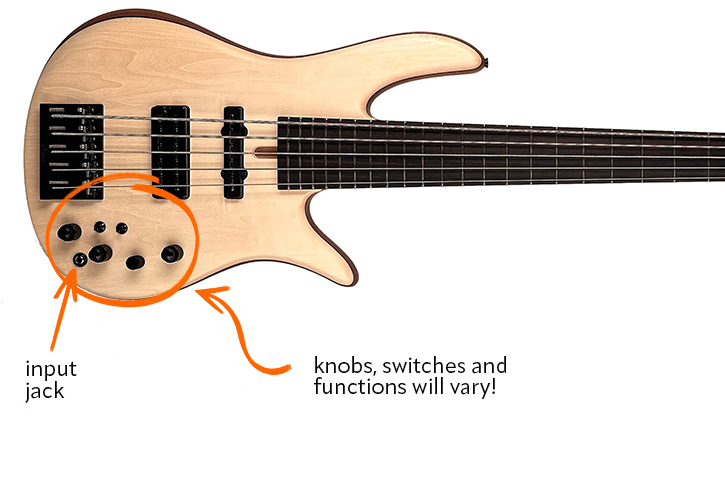
If your bass isn’t a P or J type of bass, or if you have a bass with active pickups (this means that the bass requires a battery to power the pickups), you’re F*&%ed.
Just kidding.
There are so many different basses and different configurations for knobs that it is impossible to describe them all here. You’ll have to look up the manual for your specific bass to figure out what your extra knobs and/or switches do. But they will most likely control volume and tone in some configuration or another.
![]() Pro Tip: If you do have a bass with ACTIVE ELECTRONICS, unplug the cable from the bass when you’re not playing or else you will DRAIN the batteries and your bass won’t make any sound. Or it will make weak, fuzzy farty sounds instead of big, luscious bass sounds*…
Pro Tip: If you do have a bass with ACTIVE ELECTRONICS, unplug the cable from the bass when you’re not playing or else you will DRAIN the batteries and your bass won’t make any sound. Or it will make weak, fuzzy farty sounds instead of big, luscious bass sounds*…
*…which, if you’re like me, could lead you, maybe, one day (well into your professional performing and teaching career) to bring 300lbs of bass gear to a repair shop because your rig sounds weak and fuzzy and farty, and after you load it into the shop the repair guy will ask you “have you changed the batteries in your bass?” and you’ll look at him with a mixture of gratitude (for saving you hundreds of dollars in repair) and embarrassment at not having discovered this all by yourself.
Now – what about those amp knobs?
Different amps will have different knobs, but there are some similarities and some helpful tips.
A quick fix to set your amp to its most neutral setting would be to set all the knobs except the volume knob to 12 o’clock.
(A 12 o’clock volume knob has the potential to rattle things off shelves and shake your bowels. Be careful.)
It’s usually safest to set the volume knob all the way off, and then gradually bring it up to a level where all neighbors, family members, pets and law enforcement personnel can tolerate it.
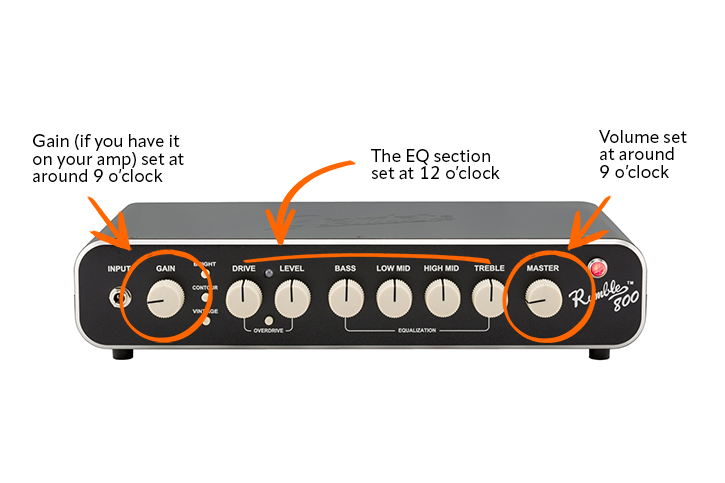
Our goal here is to get a decent sound, and this ought to do it.
I highly encourage you to look up the manual for the amp and futz around with those knobs and the other knobs on your bass if/when you want to explore your tonal options. But an appropriate volume and a 12 o’clock setting for other knobs should get you going.
You may have noticed that there are two volumes to mess with. A volume control on your bass, and a volume on your amp. Which one should you use?
The simplest way to set the overall volume is to start with your bass volume maxed (or close to maxed) and then, as described above, gradually adjust the real volume at the amplifier.
You have the power! You have the volume! You know what your knobs do! But don’t play yet! Wait! There’s a very important body-saving step that comes between getting volume and making that sweet, sweet bass music.
#3Assume The Position
Playing in a bad position makes it hard to play and can even cause pain and injury. Take it from an over-aggressive bad posture player! Save thyself and follow these 5 tips to get properly set up to play.
Tip #1
![]() Sitting Position
Sitting Position
If you’re sitting, you want to be high enough to get your hips level with or above your knees so you don’t hurt your lower back.
Tip #2
![]() Bass Position
Bass Position
The most common place to put your bass (while seated) is – if you’re right-handed – over your right leg.
- Having the bass over the non-plucking hand leg works for some people, especially for higher notes, but it pushes the lower notes further away so they’re harder to reach.
- You can try both and go with what feels best.
Tip #3
Strap ![]() On!
On!
You should always play with a strap on, sitting or standing, because it stabilizes the bass and takes the weight off your hands so they can focus on playing.
- Attach each end of the strap to the two strap buttons on your bass – most commonly found on the top horn of the bass and on the side of the bass body just past the bridge.
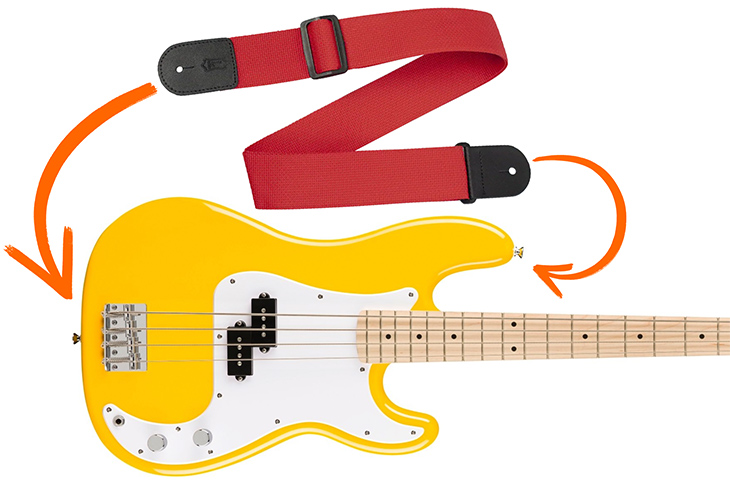
- Put your head and plucking arm through, and you’re ready to go.
- There is a huge variation in professional players of how high or low their straps are set for playing. You’ve got Robert Trujillo, who has his bass hanging down by the floor, then there’s Mark King who wears his right over his nipples.
- For easy learning, I recommend setting your strap height so that your bass is in about the same place whether you sit or stand.
Tip #4
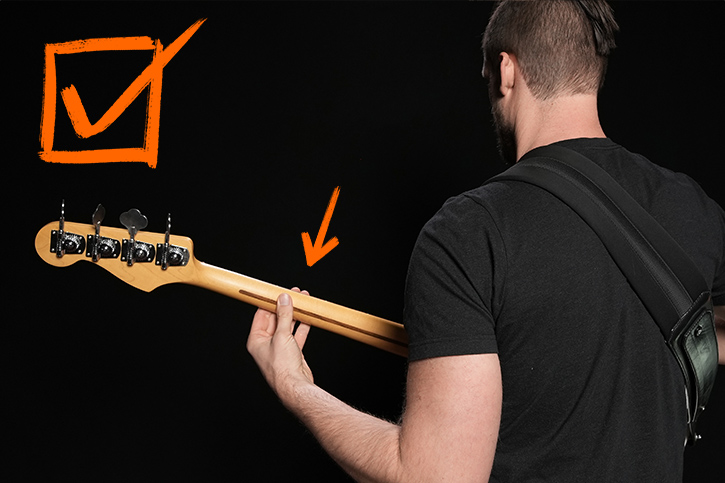
Bass Neck ![]() Angle!
Angle!
For most playing it’s nice to have the bass neck angled up a bit and not parallel with the floor. This is not a hard and fast rule, and you’ll see all kinds of variation here with pro players.

Tip #5
![]() Headstock Position
Headstock Position
Push the headstock away from your body slightly to get better access to the neck. The headstock is the part of the bass that anchors the strings and has the tuning pegs. You’ll want to create an angle with your chest of about 30-40 degrees rather than flat against your chest.
- This gives you more room to move your fretting arm comfortably, especially higher up where you’d otherwise get stuck with your arm running right into your torso.
You are so damn close. You’re plugged in, the knobs are set, you’ve adjusted your position to ensure maximum comfort and minimal long-term damage to your nervous system… great!
Just one more absolutely crucial step before you can start actually playing your bass.
#4Tune Up
You need to make sure your bass is in tune.
![]() If you’re not tuned up, everything you play will sound off and wrong, and you won’t match up with any song or other instrument you try to play with.
If you’re not tuned up, everything you play will sound off and wrong, and you won’t match up with any song or other instrument you try to play with.
You tune your bass by turning the tuning pegs, or tuners, which will either loosen or tighten the string which will change the sound.
The tighter your string, the higher the pitch. The looser your string, the lower the pitch.
Using A Tuner
You can tune your bass by ear – by matching your strings to the correct notes played by another instrument – or you can use an electronic tuner which could be:
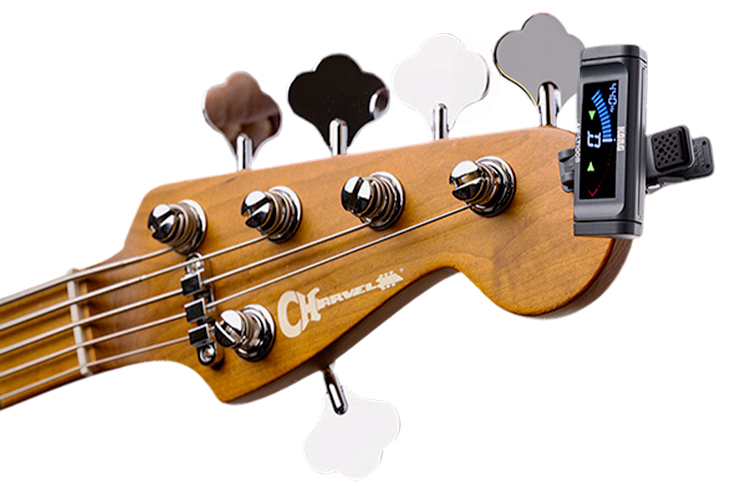
![]() A clip on tuner
A clip on tuner
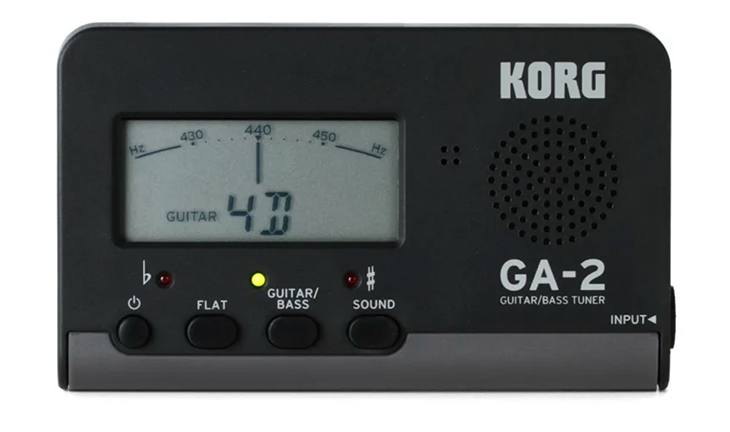
![]() A plug-in tuner
A plug-in tuner
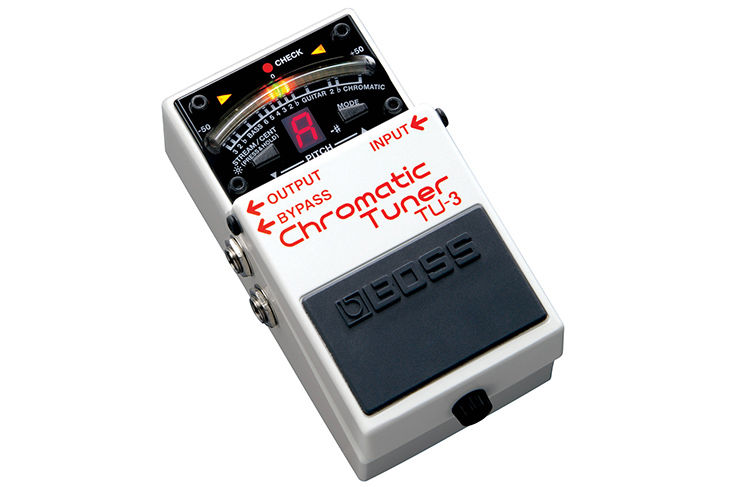
![]() A pedal tuner
A pedal tuner
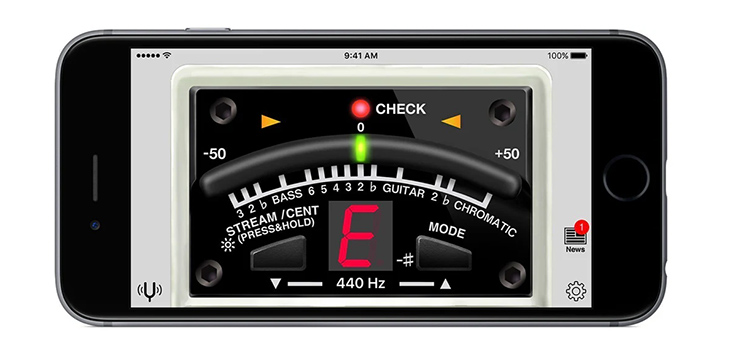
![]() Or even a tuning app
Or even a tuning app
I recommend using a tuner – whatever one is easiest for you to get. When you’re just starting out, tuning by ear can be nigh impossible. A tuning device is easy to use and much more reliable.
Names Of The Strings
The only thing you need to know in order to use that tuner and get your strings in tune is the names of your strings.
The names of the strings from thickest to thinnest are: E A D G.
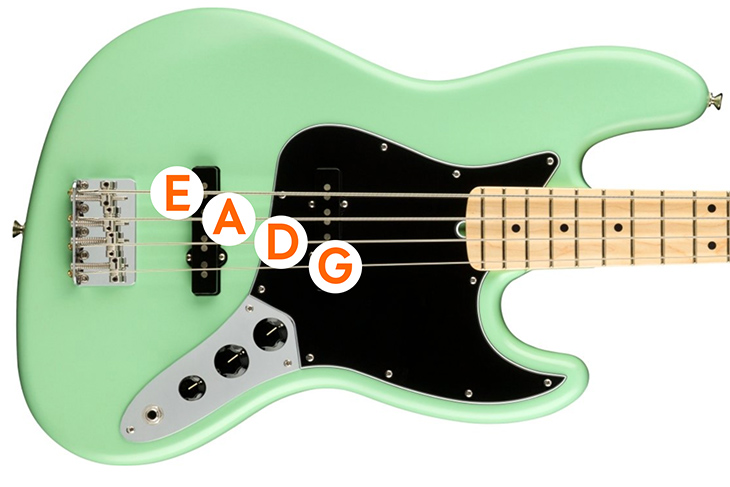
You can use a mnemonic to help remember this.
Josh’s favorite is Eat And Drink Grapes.
I like: Every Alligator Devours Grapes… or Eve Adores Dark Green or Excellent And Delicious Gyros…
I actually don’t think any of my mnemonics are helpful. Josh’s is. We’ll use his.
Those are the only notes you need to know for tuning: EADG.
Do you need to learn the other notes?
Definitely.
But that’s an adventure for another day.
Now…
Time to get your hands on them strings and make some bass sounds.
You can also use this handy mnemonic: Everyone’s Allabout Discoveringour Greatbeginnerbasscourse.
Wait, maybe this is just a plug for our really good beginner course. Check it out here.
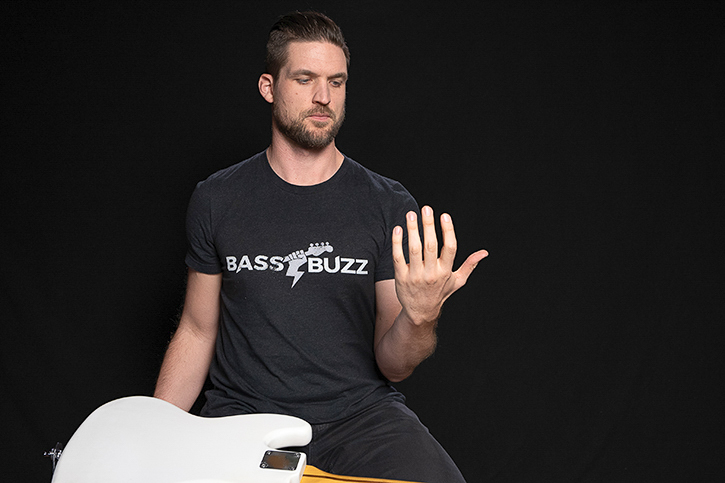
#5Plucking
Your hand by the body of the bass is in charge of plucking the strings. This is how you make bass sounds. It’s like the mouth of the bass. It controls how loud, how soft, and what tone of voice your bass is going to talk with.
If you have bad plucking technique, you’ll hit the wrong strings, won’t be able to keep up with quick tempos, the tone will suck, etc. You’ll sound like the bass version of someone talking with a mouthful of banana. Your plucking technique needs to be on point so your bass sounds good.
Here are 3 essential plucking tips to sound legit.
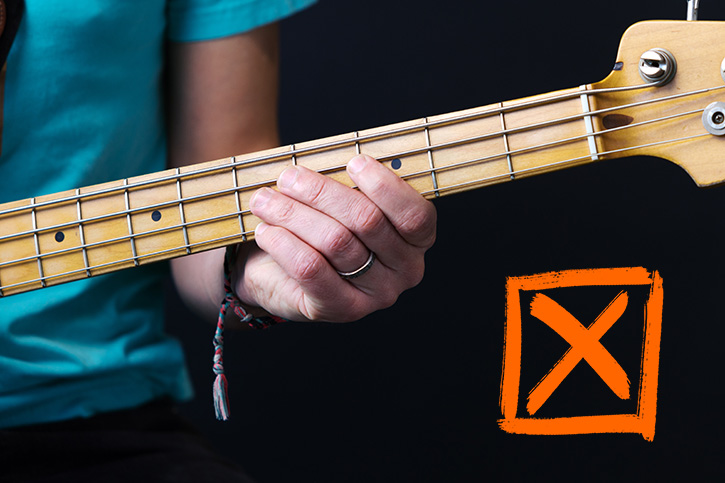
First – The Thumb Anchor
You gotta rest your thumb somewhere so your fingers can find the strings consistently. If you constantly change the position between thumb and fingers, your fingers are much more likely to get confused and pluck random notes and strings.
Your anchor point can change depending on what strings you’re playing and what the specific bass line calls for.
You might rest your thumb on a low string, like the E or the A. You might rest that thumb on a pickup.
- I’ve mentioned pickups a few times now. Pickups are those magnet-y, blocky bits under your strings that turn the vibration of your strings into an electrical signal that your amp turns into juicy bass sounds.
- If you are resting your thumb on the pickup and your bass has two pickups (like on J bass models) you should default to the one closest to the neck, not the bridge, for most music.
![]() Bass Explorer bonus points: you don’t have to take my word for it. Try playing the bass in both places. You’ll find the strings much STIFFER and BRIGHTER sounding if you pluck closer to the bridge. If you like that and have the PLUCKING STAMINA to make it work, maybe that’s your spot.
Bass Explorer bonus points: you don’t have to take my word for it. Try playing the bass in both places. You’ll find the strings much STIFFER and BRIGHTER sounding if you pluck closer to the bridge. If you like that and have the PLUCKING STAMINA to make it work, maybe that’s your spot.
Second – Alternate Plucking
You pluck with your index and middle fingers, alternately.
This is not the only way to pluck. You could play with one finger (which is simple, but hard to keep up with faster bass lines), or you could play with three fingers (which gives you the potential for crazy speed, but is extra hard to learn).
We use two fingers for standard bass plucking technique because it’s not too hard to learn, and you can still get plenty fast since your index and middle fingers share the load.
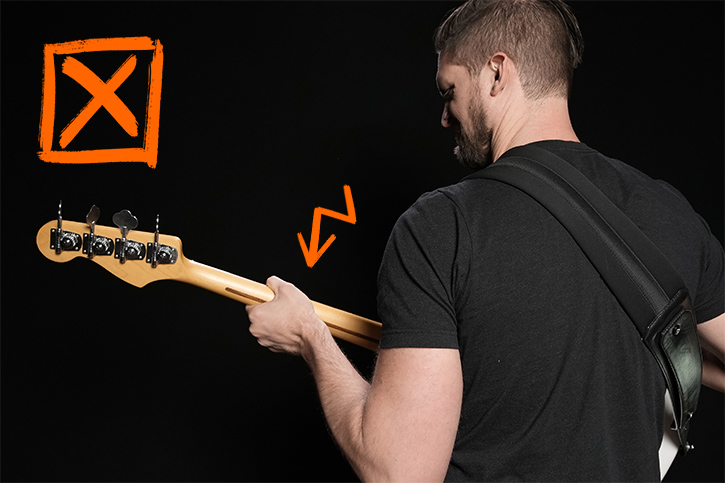
Third – Pull Across The String
You must (cue echoing god-like narrator voice) pull across (end god voice after one nice peal of thunder) the strings.
This is the number one secret to big, beautiful bass tone and to not sounding like a noob when you pluck.
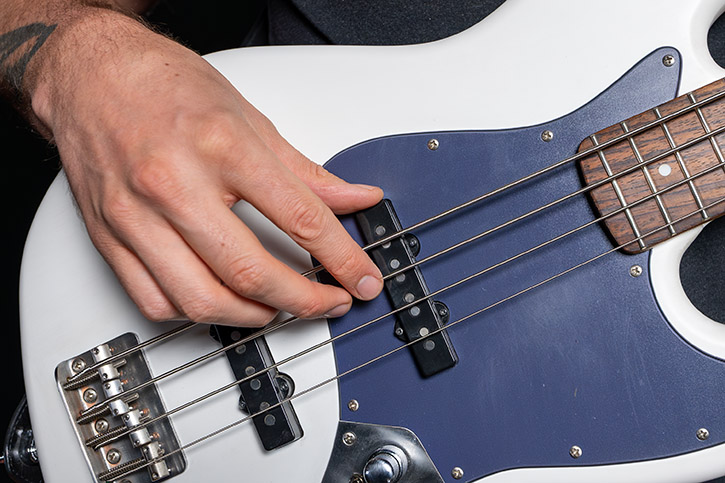
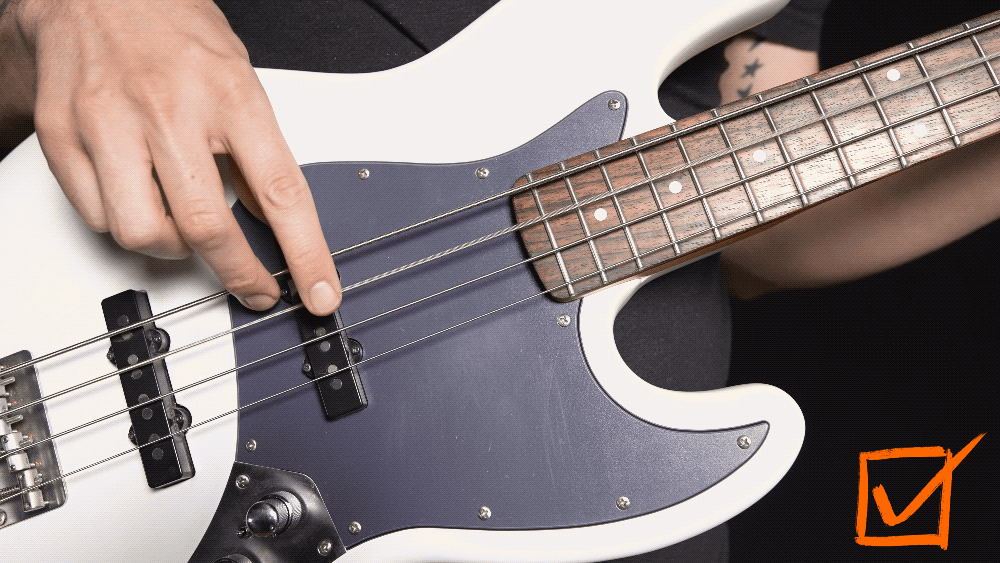
It’ll help to have a visual, so check this out:
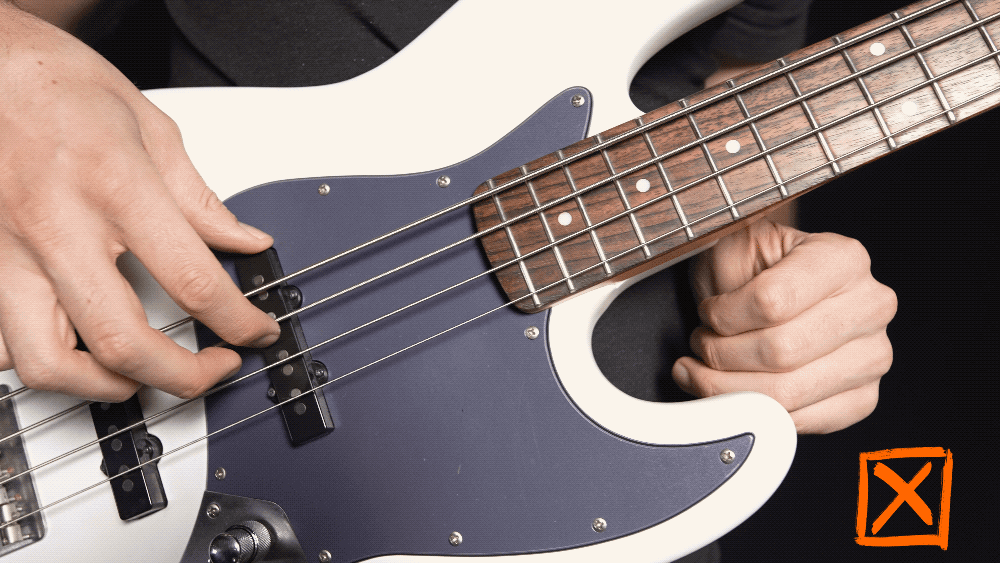
Many beginners will get their finger on the string and then pluck up and away from the bass. This is not the sound you want. It will be thin and wimpy, and you never want to use the words thin and wimpy when describing your sumptuous bass tone.
To sound more legit and solid, you want to pull across, into the next string (or your thumb if you’re on the E string).
By pulling across and into the bass, you’re going to roll the big, meaty parts of your fingers right over that string and pull out all the biggest, lowest, juiciest tones possible. It also helps keep unwanted string ringing to a minimum.
Anchoring the thumb, alternating those fingers and pulling across the strings is not easy. Remember, none of this is supposed to be easy. Time, practice and patience will take these skills from awkward-frustrating-obstacles to automatic-muscle-response if you can put in the hours.
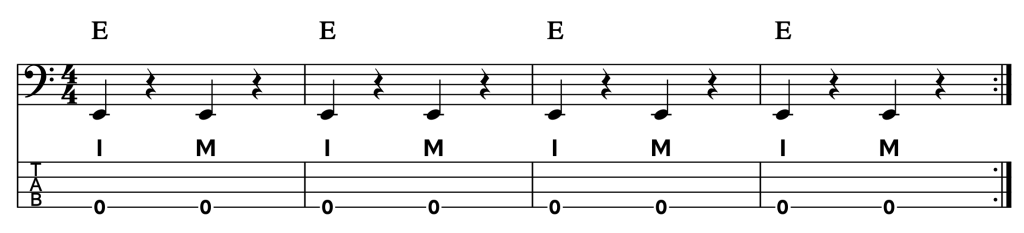
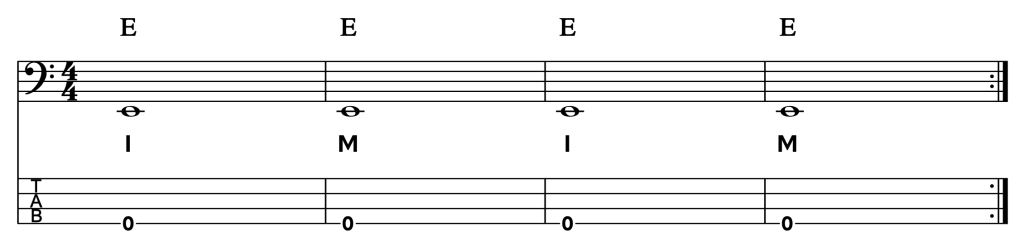
Here’s a perfect first plucking exercise to practice. Eventually you’ll want to be comfortable plucking all your strings, but focusing on just one string for now will be the easiest way to get started.
In this exercise, you’ll be plucking on the E string along with some music.
Prepare thyself!
Check out the tab.
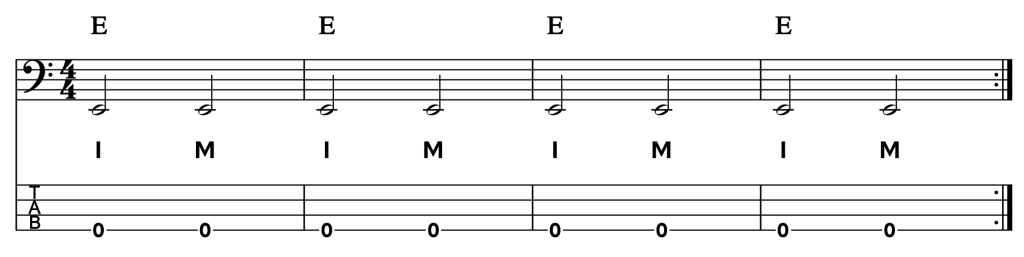
- Anchor your thumb on your pickup.
- The playalong track will give you four beats. Keep counting to four, over and over again at that rhythm while you play. Or just keep it in your head.
- On beat 1, pluck the E with your index finger.
- On beat 3, pluck the E with your middle finger.
Now play along with the track:
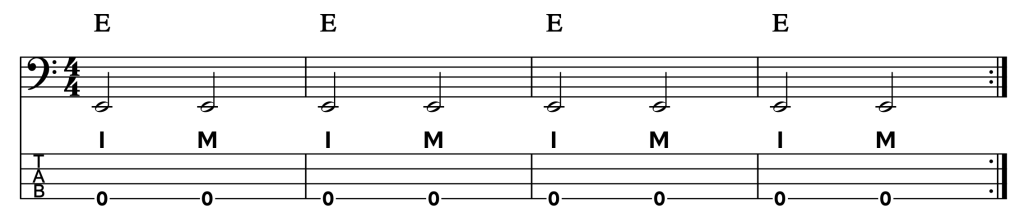
That’s a great start to your plucking technique. But now we need to make that bass line sound (ohhh yeahhhh) a little funkier.
You can do that by muting the strings in between plucks, to leave more space for the funk to get out.
Muting Your Bass
In the previous exercise you were plucking – using alternate fingers – on beats 1 and 3. You plucked a note on 1, and the note rang out until your next pluck on 3.
No more!
On counts 2 and 4, you’re going to shut off that ringing note. You can do this in two ways.
Option 1: You can touch the strings with all the fingers on your fretting hand. Not pressing or adding any pressure, just touching the strings so the strings can’t vibrate. Like your hand is a fuzzy blanket. No weight, no pressure, just a thing to stop the vibrations.
Option 2: You can touch the E string with your plucking fingers which will do the same thing – stop those vibrations. It will also set you up for your next pluck.
Bonus Option 3: You can also do both at the same time. It never hurts to do a little extra muting when you’re trying to clean things up.
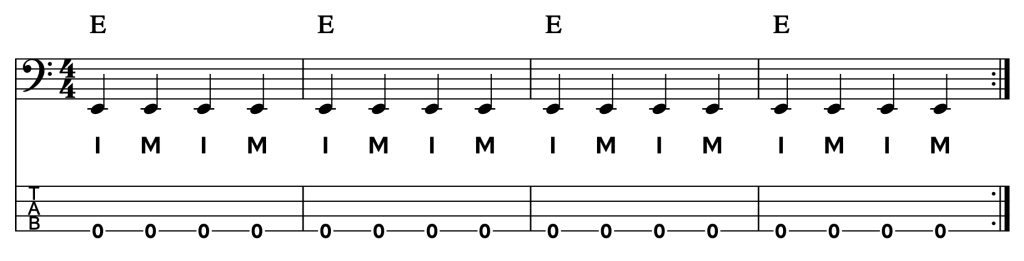
The exercise will now be pluck (index), mute, pluck (middle), mute on counts 1, 2, 3, and 4 respectively.
Now that you’re getting a good sound and you know how to pluck the bass, it’s time to bring the other hand into the bass playing game which brings us to…
#6Fretting
The fretting hand is, well, the one that wasn’t plucking. It’s the hand over by the neck of the bass. Fretting is pressing the strings against those little metal wires (the frets) which changes the sound your bass makes.
If you don’t know what you’re doing with your fretting technique, it’s pretty easy to make horrible buzzing noises, waste energy with sloppy movements and even hurt yourself contorting into weird hand positions. So here are 3 fretting tips to get things sounding goooooood.
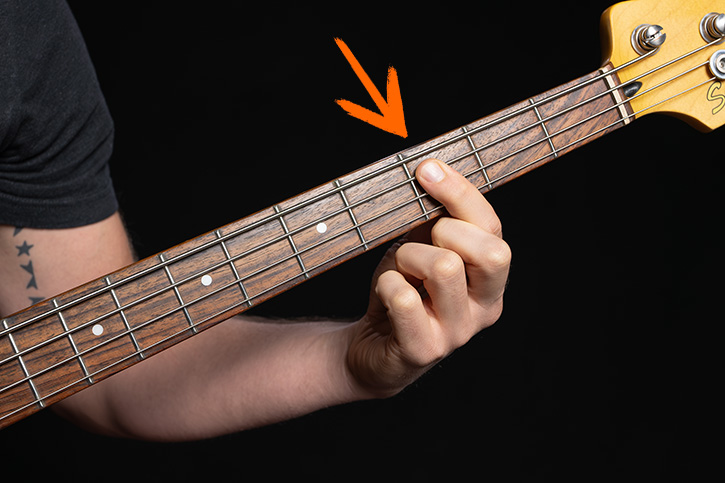
Tip #1
Dialing in your basic hand position
First, let’s dial in your basic hand position.
Put your bass on a stand or, if you’re wearing it, get the strap off your neck and just lay the bass string side down on your thighs.
With a relaxed arm, bring your fretting hand palm in front of you.
Look at it!
This should be a pretty chill comfortable position – shoulder relaxed and dropped down, elbow relaxed, wrist fairly straight or bent forward slightly, fingers straight or curled forward, and thumb resting to the side of your hand.
Now, without changing anything, grab your bass and plop the neck into that gorgeous, relaxed fretting hand.
That’s basically what you’re aiming for with your fretting technique.
This basic, relaxed approach will eventually see you fretting with each of your four fingers. You’ll often hear teachers say to keep your fingers perpendicular to the strings. This is not an exact measurement. It’s somewhere between perpendicular and slightly angled. We sometimes over simplify and say “perpendicular” so as to avoid the dreaded turned-wrist, fingers-curled-and-pointing-towards-the-bridge move that we so loathe.

The exact angle will vary depending on how far your arm is from your body.
Tip #2
The Fretting Hand Thumb
Next, let’s give some special attention to your thumb.
There’s a lot of bad advice going around out there that you should force your thumb to stay behind your middle finger.
You really don’t need to do that most of the time, and it adds a lot of tension to your hand.
Remember how it looks when your hand is relaxed? That’s right – it’s chillin’ off to the side.
Aim to replicate that on the back of the neck – wherever it wants to lay, just let it.
It can point along with your fingers or more toward the headstock.
Just keep it as relaxed as possible! You’ll feel the urge to jam it into the neck, but that pressure is unnecessary and will make your hand hurt.
Tip #3
Where and how to Fret
Final fretting tip!
When you press down, aim for the end of the fret closest to the pickups.
The area between those metal wires is called a fret, but you want the part right behind that piece of metal called the fret wire.
That’ll make it easier to get clean notes that don’t buzz.
Also, you aren’t pressing the string against the wood of the bass fingerboard. You only need to create a clean, solid contact with the string against that fret wire. That’s why the space directly behind the fret you want to play is the best location for a clean, clear bass note.
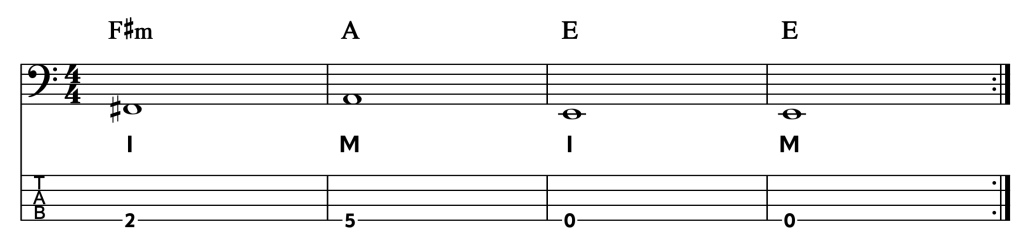
Time to practice your fretting technique with some music.
For this exercise you’re going to play two notes, the 5th fret and the 7th fret of the E string.
Remember, the E string is the fattest one, Eat And Drink Grapes, EADG.
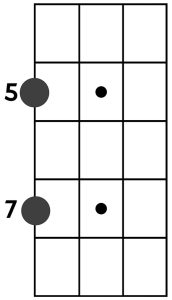
Notice those frets have dots. Dotted notes are not special, the dots are just visual markers to help you track where you are on the bass.
Use your pinky finger on the 7th fret note, and your index finger on the 5th fret note.
Just pluck on that 7th fret note once for 4 counts, then lift the pinky and play the 5th fret note once for 4 counts. In this exercise you’re going to go back and forth between those two notes and only those 2 notes.
If your fingers are getting tired, or the skin’s getting roughed up, it’s all good, you’ll have a lot more stamina and skin toughness after the first few weeks.
Again, the playalong will have 2 tracks, one with the bass and one without.
Pay attention to the counting, stay on target, and fret some notes.
Now that your plucking hand and your fretting hand are both working together and sounding good, it’s time for the final step.
#7Groove With The Music
You may have good plucking and fretting technique, but you still won’t sound like a bass player until you nail this final piece.
The most important thing as a bassist is groove – locking in with the rest of the band so that the music feels good.
I’m going to show you 2 steps towards making sure your playing is solidly grooving.
Any time you listen to music, there’s a pulse that you can bob your head or tap your foot to. Feeling that pulse is step 1 to grooving with the band.
Part 1: Feeling The Pulse
If you play without feeling where that pulse is, you’ll be playing at weird times, zigging while the band is zagging, and otherwise disrupting what should be a very collective and comfortable groove.
If you’re feeling the pulse but don’t have a plan of what rhythm you intend to play, it’s easy to get lost in your own brain, lose the pulse, lose the groove, lose the band, lose your job, your friends – everything.
Kidding. But only about the job, friends and everything parts.
In order to have a solid plan for your playing, now that you’ve found the pulse, you need some simple rhythms to play that align with the pulse and the band.
That’s part 2.
Part 2 – Play Simple Rhythms To The Pulse
Here’s a track.
Listen to it and find that pulse – the place where your head bobs and your toe taps.
Each of those pulses, in musical terms, is called a beat.
We name the rhythms we play after how many beats they last.
If you play a note that lasts 4 beats it’s called a whole note.
You pluck the note on beat 1, and it lasts through all 4 beats.
Here’s the example of open string E whole notes with that same drum track.
A note that only lasts 2 beats is called a half note.
Again, with that same drum track you’d pluck the note on beat 1, it would ring through all of beat 2, and then you’d pluck again on beat 3, and it would last all through beat 4.
Here’s what it sounds like:
If the note only lasts one beat, it’s called a quarter note. For our 4 count, each of the beat counts would get its own pluck. You’d pluck on beat 1, pluck on beat 2, pluck on beat 3 and pluck on beat 4, and make sure the note is ringing and sounding in between those plucks. Don’t cut it off too soon!
There are plenty more rhythms to learn – eighth notes, 16th notes, triplets, for example – but the three rhythms you just played are the place to start.
Playing Your First Song
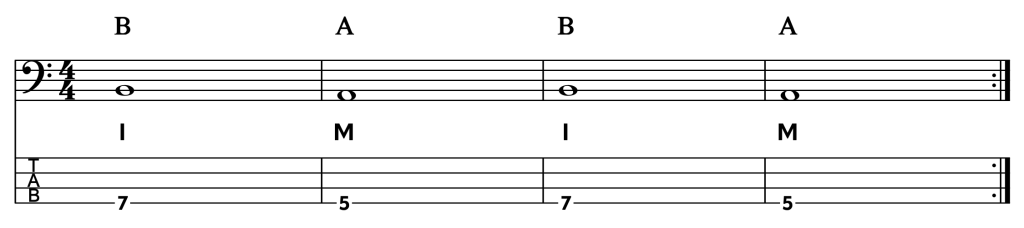
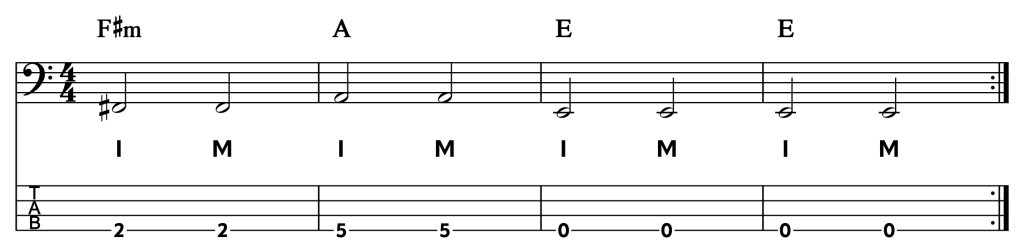
Let’s put everything you just learned into music with the song High and Dry by Radiohead.
We’re simplifying this bass line a bit, but it’s still legit enough to play in a garage with your friends.
I’m going to show you what notes to play, and how many beats each note will get.
Take your time getting your orientation and comfort solid with this musical roadmap before you try and play along with a recording. Recordings and performances don’t stop for mistakes!
Relax, take your time, and then, when you’re ready, hit play.
All the notes are on the E string, which, if you remember to Eat And Drink Grapes, is the fat one closest to your face.
The first note will be played on the 2nd fret of the E string.
Fret the 2nd fret note with your index finger. Use good technique in your plucking hand to pull a beautiful sound across the strings. Use your elegant fretting technique to relax the hand, and remember to press just behind the 2nd fret wire.
Pluck that gorgeous note.
The next note of the song will be played on the 5th fret with your pinky finger. Everyone needs pinky strengthening practice, and this gets to be some of yours.
You don’t need to keep your hand anchored and stationary and stretch only your fingers from the 2nd fret to the 5th fret. You can just slide your hand down to comfortably reach that 5th fret in what’s called a ‘microshift’.
The next note will be the open E string.
To play that, pluck the E string without fretting anything.
Those are the 3 notes you’ll need.
We’ll mess around with the different rhythms you just learned to see how it affects the song.
Once you feel comfortable moving from the 2nd fret to the 5th fret to the open string, you’re ready to play.
You’re plugged in, knobs are set, you found a comfortable position sitting or standing, you’re tuned up, you’re plucking with index and middle, pulling across, thumb anchored on the pickup, your fretting hand is nice and relaxed, fretting with index and pinky…
You have made it. Let us rock.
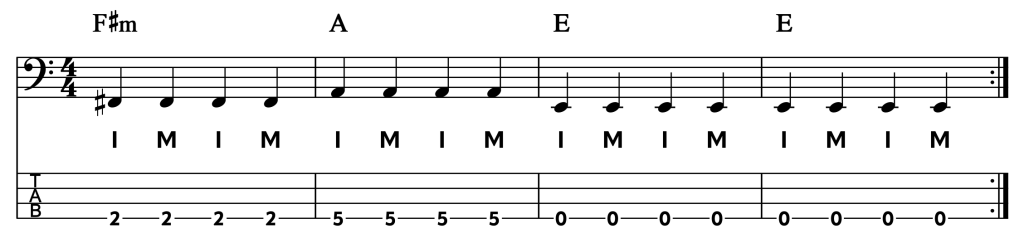
Try each of the playalongs with each different rhythm.
Try making your own rhythms inside of the song’s pattern. Enjoy it.
If that was your first real song ever, congratulations and welcome to the bass family.
Conclusion
Learning new things is hard, but at least at the end of this gauntlet you got to play some Radiohead.
Congratulations on making it through and putting together these crucial and foundational skills!
The road ahead will be difficult, but it will also be filled with people begging you to play bass in their bands.
Good luck, Godspeed, and know that we’re out here cheering you on and ready to help should you ever have a question.
Because, after all, we’re family now.

Comments
Got something to say? Post a comment below.